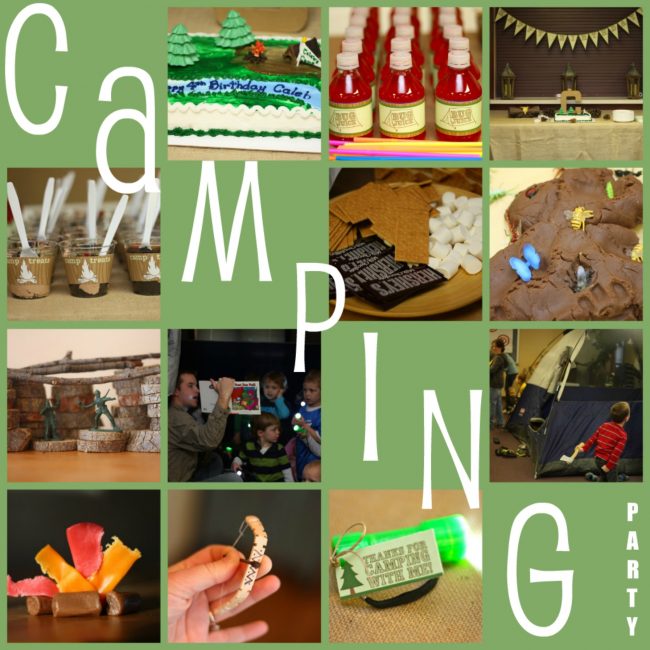
Camping Birthday Party


Big Brother experienced his very first camping adventure this last year.  In September, he and his Daddy went with several other fathers and sons from our church on a one-night camping trip.  I honestly expected them to be home by sundown, but Big Brother totally LOVED it!  Even though a certain female member of our family who shall remain unnamed (uh-hum) isn’t all that into camping, I knew it would be a fun theme for Big Brother’s 4th Birthday Party.  Plus, this is the first birthday party where we have invited people other than family!

Having a birthday party in the dead of winter sorta stinks.  But we decided to bring the outdoors in at our church’s fellowship hall and it was TONS of fun!


Invitations and Decorations

The invitations for Big Brother’s birthday party were designed by my friend Rachel at RV Parties.  She simply sent me the file and I printed them off at our local Walgreens as 4×6 photos.

Go here for the invitations

RV Parties also has an amazing camping party printable set that comes with a ‘Happy Birthday’ banner, cupcake wrappers, cupcake toppers, water bottle wrappers, treat bag toppers, Thank You Cards, and food labels.

Go here for the camping party printable pack

We didn’t do a whole lot besides this for decorations, but I did buy several yards of burlap from JoAnn’s to cover the two tables we used.  We also brought our tent (Big Brother’s birthday gift from us) and set it up for the kids to enjoy.  I took this picture before all the food was set out…so please disregard the empty table space.  :)

The lanterns we used were from my sister’s wedding and the pine cones were from our yard.

We also used this campfire from Insect Lore.

We used just white styrofoam plates and green striped napkins I found at Target.  I really wanted to get these plates, these dessert plates, and these napkins but I couldn’t justify spending over ($30 with shipping) for something that would inevitably end up in the trash!

Food

The camping theme allowed for some really fun food!

The same lady that made our wedding cake made this cake…for $17!  The two pine trees are made of pure chocolate!

This handy-dandy Old Fashioned S’more Maker allowed us to make this camping essential without an open flame!

Activities & Games

Instead of doing group games, I just had several child-size tables set out with various activities on each and let the children go to each table individually.  Here are the activities we included:


Digging for Bugs in Chocolate-Scented Playdough

Build a Fort with Tree  Branch Blocks

Make a Miniature Bow-and Arrow (free printable labels included)…just make sure to set up a ‘shooting range’ to keep the kids from shooting each other!  

Build individual candy campfires!

This might have been the favorite among the kids…and it was the simplest!  We just brought some pipe cleaners and beads and let the kids make bracelets and necklaces.

Color your own t-shirts!  Little boys undershirts and fabric markers are a great and inexpensive way to let kids design their own t-shirts.

Tree Trunk Stompers!

The kids enjoyed walking around on these.  Go here to find out how to make them!

Chop-a-Log (this was a hit)

Read books in a tent!  Be sure to check out some of our favorite camping books!

We set out this camping-themed felt board on one of the tables for the kids to play with as well.

For each of the above activities, I covered the child-size tables with brown craft paper and then put the following table stands that I printed out on cardstock, cut out, bent, and trimmed.

“Chop A Log” and “T-shirt Decorating” Table-Top Labels

“Build a Fort” and “Make a Bow & Arrow” Table-Top Labels

“Read in the Tent” and “Digging for Bugs in Mud” Table-Top Label

Party Favors

We chose to give out flashlights for our party favors.  Since I had this theme in mind for a few months ahead of time, I found an amazing deal on glow-in-the-dark LED flashlights after Halloween at Lowes.  The packaging was Halloween-themed, but I decided to take the flashlights out of their packages anyway.  I didn’t end up having enough, so I ordered these LED flashlights from Amazon, which were also great and inexpensive (they just don’t glow in the dark).


I shrunk the treat bag toppers included in the camping pack from RV Parties to make little tags for each flashlight.


What I love about these flashlights is that they turn on with the black button on top, so even the little ones can turn them on and off by themselves.


Happy Trails!!!


*Please note.  Some of the links above are my affiliate links.  Be sure to read my disclosure policy.


  • Share This Post:
  • Share This Post on Facebook
  • Share this Post on Twitter
  • Email this Post

DIY Birthday Shirt

Last year I spent WAY too much money on a first birthday t-shirt from Etsy for Little Brother.  I justified this expense by telling myself that he would wear it more than just once.  I was wrong.  He wore it once.

So this year, I spent all of about $5 on a number 2 shirt for his second birthday.  It was SUPER easy and took me less than 30 minutes from start to finish!  And I didn’t even know what I was doing!

Here’s what you’ll need:  a shirt, some scrap fabric, pinking shears, some iron-on webbing, and a threaded sewing machine (or you could hand-sew).

Here’s the kind of iron-on webbing I used.  I had it leftover from the Car Mat Backpack.


And here are the step-by-step directions.

1. Follow the directions on your iron-on webbing and iron it onto the back of your scrap fabric.

2.  Print out the number you want and cut it out to use as a stencil.

3.  Turn it upside down and trace it onto the back of the fabric (with the webbing already sewn on).

4.  Cut the number out of the fabric using pinking shears.  This will keep the ends from fraying.  Remove the backing on the webbing.  I forgot to do this and attempted to iron it on with the backing still on.  Needless to say, this didn’t work.

5.  Center the number on your shirt and get ready to iron!

6.  Follow the directions on your iron-on webbing to secure the number to the shirt.  The type I used called for us to use a damp cloth between the iron and the shirt.

7.  Sew the number onto the shirt by making a stitch that goes around the perimeter.

And that’s it!

And here’s Little Brother sporting his #2 shirt on his second birthday…

  • Share This Post:
  • Share This Post on Facebook
  • Share this Post on Twitter
  • Email this Post

Make It: Felt Birthday Banner

I first made this banner when Big Brother turned 1, already 2 years ago.  I got the inspiration from a felt Christmas banner my mom had.  Even though it took a couple hours to make, it was totally worth it…especially since it now hangs for every person’s birthday in our family!

Big Brother has his own “name” to add underneath the “Happy Birthday.”  So, I decided I needed to make one for Little Brother too.

The directions will only show the making of Little Brother’s name, but the same steps apply to the “Happy Birthday” part as well. 

Here’s what you’ll need:  assorted colors of felt (I used red, yellow, green, dark blue, and light blue), paint, a paintbrush, a hot-glue gun, and some string.

1.  Cut out rectangles from the felt.  My rectangles are 4″x5.5″.  You’ll need to cut out 13 rectangles for “Happy Birthday” plus the number of letters in your child’s name (if you choose).

2.  Use paint (I used tempera) to add designs to every other square.  You’ll want to lay them all out before starting to paint.  I did stripes, polka-dots, and squiggly lines.  Let dry.

3.  Print out all of the letters from Word (I used the “Arial” lower-case font, size 250).  You’ll need the letters H-A-P-Y-B-I-R-T-D and then the letters of your child’s name.  You don’t need to print out duplicate letters since they will only be used to trace.  You could also use a stencil.  (And apparently, I really do need to replace the black ink my printer’s has been telling me to replace for the last month).  :)

4.  Cut out the letters.

5.  Turn the letters upside-down and trace them on the back of your extra felt.  Cut the letters out so that your on the outside edge of the line you traced (to make it thicker).

6.  Center the letters and hot-glue them to the front of the felt rectangles.

7.  Once the front has had time to dry, cut out small rectangles (2 per each larger rectangle).  Put a small line of hot glue on the top and bottom of each of the small rectangles and place on each of the top corners of the larger rectangles.  This is where the string will pass through to hold the individual rectangles up.

8.  Thread the string through the backside of each rectangle. 
I just used two pushpins to hold the string up and then put the child’s name below on a separate string.

You’ll only be able to see the squares through the felt if you place your banner in a window and take a picture of it in the middle of the day.  :) 

Here it is on the mantle for Prince Charming’s Birthday…
…And at our old house for Big Brother’s 2nd Birthday!

You could make the banner in whatever color you like!  I am partial to the primary colors (for boys especially) because it goes with just about every theme.  :)

  • Share This Post:
  • Share This Post on Facebook
  • Share this Post on Twitter
  • Email this Post

Transportation Birthday Card

I couldn’t help but post this adorable birthday card from Alison at Oopsey Daisy.  Not only does this card go great with our transportation unit, but Prince Charming’s birthday is today!  Little Brother helped me make one a few days ago for his Daddy (though ours looks as though it was definitely created by a two-year old).  :)

Go here for instructions on how to download and print it for your little one to create!  The printable download is not specific for “Daddy”, so you can make this birthday card for anyone!

  • Share This Post:
  • Share This Post on Facebook
  • Share this Post on Twitter
  • Email this Post