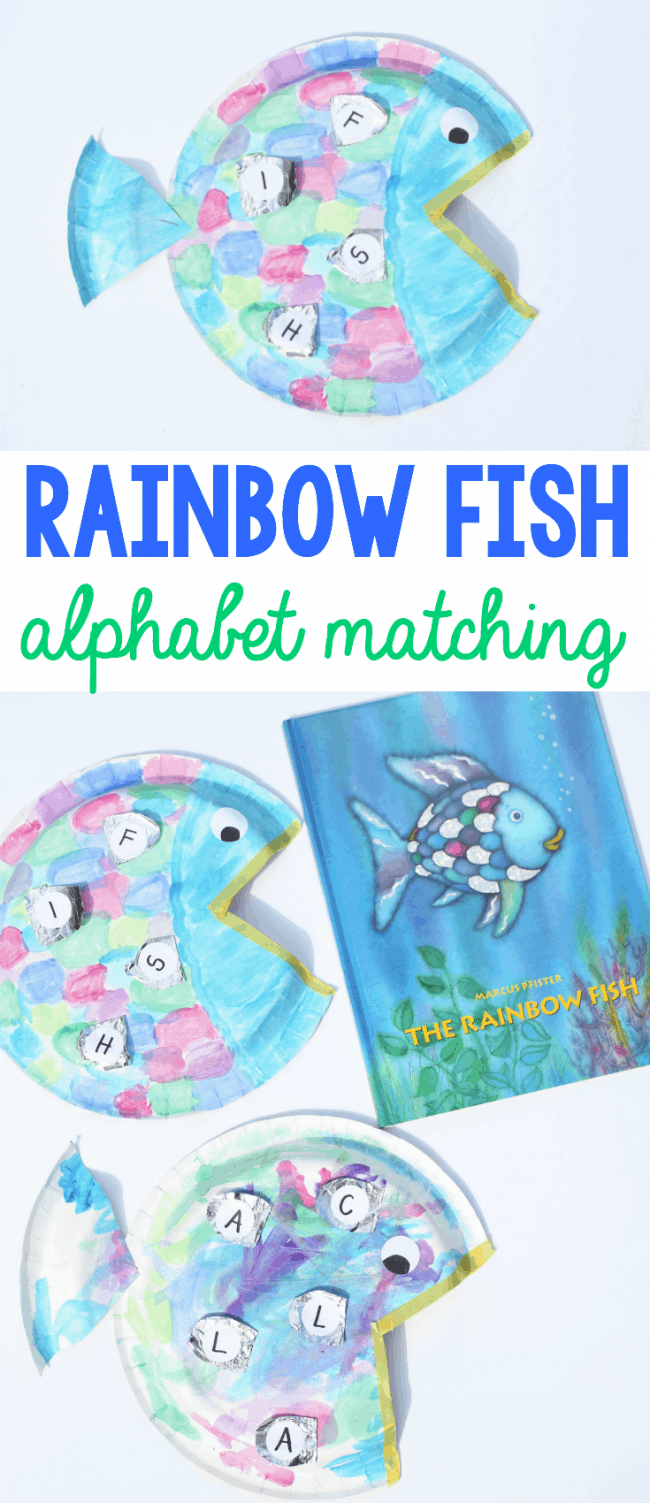
Sponge Relay

This activity is embarrassingly simple.  It would be a great activity to do when there are multiple children around, but since this was thought up spur-of-the-moment, we made do with just Big Brother.

Here’s what you’ll need:  2 large bowls, a sponge (or two for multiple children), and some water. 

If you have an older preschooler, make a table on a piece of scrap paper like the one shown below.  This will add a cognitive dimension to this activity as well.

1.  Measure out cups of water…however many will fit in your bowl to make it 1/2 to 3/4 full.

2.  Take all of your materials outside and place the two bowls a distance apart.

3.  Have your child soak the sponge in the water and run to the other bowl as fast as he can. 

4.  Then, encourage him to squeeze the water out of the sponge (fine motor practice as well). 

5.  After all the water is gone from the first bowl, measure the water left in the second bowl.  Record it onto your table.

6.  Talk to your child about why there wasn’t as much in the second bowl (it dripped while running, some was soaked into the sponge, etc).  This helps develop a sense of cause-and-effect.  Also talk about which number is more and which is less.

This activity was such a hit for Big Brother.  He kept asking if we could do it again!  He wasn’t developmentally able to understand the discussion on numbers, but we still tried! 

  • Share This Post:
  • Share This Post on Facebook
  • Share this Post on Twitter
  • Email this Post

Edible Sand (Don’t follow my example)

A while ago, I saw on a website that someone made edible sand with the Golden Oreo Cookies (similar to Dirt in a Cup).  I couldn’t remember where I saw this, so I did a quick Internet search and found this one.

I bought the pudding mix and Golden Oreos without first looking at the recipe.  Big mistake.  And since I refused to go to the store in order to buy another package of Golden Oreos, it turned out extremely puddingish and not at all sandy like it was supposed to be.  Yes, I just said puddingish…I like to make up words.  :)

Here’s what you’ll need:
-2 small boxes of pudding
-2 packages Golden Oreos (the generic kind will do just fine as well)
-1/2 stick butter
-8 oz. cream cheese
-3 1/2 cups of milk
-1 c. powdered sugar
-1 container Cool Whip (which I didn’t have either)

1.  In a large bowl, mix the pudding mix and milk according to the package instructions.

2.  Add the cool whip to the pudding.  Again, I would recommend using actual Cool Whip, not the spray kind (which is all we had). 

3.  Cream butter, cream cheese, and powdered sugar together.  Add to the pudding mixture.

4.  Using a food processor (or blender), grind the Golden Oreo’s until they are a sand-texture.  My wimpy food processor can only handle 6 Oreo’s at a time. 

5.  Alternate the pudding mixture and Oreo’s in a sand pail.  This is ANOTHER place where I messed up…I just mixed it all together instead of layering it.  End with the crushed Oreo’s on top.  I promise you, it will look like actual sand if you follow the directions correctly.  :)

It was delicious irregardless of my major flaws in following directions!

  • Share This Post:
  • Share This Post on Facebook
  • Share this Post on Twitter
  • Email this Post

Don’t Call Me Crabby!

I’ve been a landlocked girl all my life.  The only time we get to go to the beach is on a major vacation.  I’m not really up to speed on the differences between aquatic animals.  So, now I’ll ask you…what is the difference between a lobster and a crab???  I could have googled it, but that just wouldn’t be as fun.  :)

I saw the idea for this Handprint and Footprint Lobster on the website Just for Fun and LOVED it.  And it uses your child’s handprints and footprint…you can’t get much cuter than that!

Here’s what you’ll need:  red paint, a piece of construction paper, a pair of googly eyes, and 2 cute little hands, and 1 cute little foot.

And here’s just a hint to make this project easier:  Use a paintbrush to paint your child’s hand and foot rather than dipping it.  It is MUCH easier.  I just had Big Brother sit in a chair, I painted his foot, then brought the paper up to him rather than having him step on it.  A quick trip to the sink and his feet were redless!

Head on over here for the step-by-step directions.

  • Share This Post:
  • Share This Post on Facebook
  • Share this Post on Twitter
  • Email this Post

SandDough

Big Brother is very sensory sensitive and sometimes has a hard time with new textures, so this coarse version of playdough was great for him!  It is super easy and takes less than 10 minutes to make.  We just used a small bag of fine sand that I found at the craft store.

Here’s what you’ll need:  2 cups fine sand, 1 cup Corn starch, and 1 1/2 cups cold water.

1.  Mix the three ingredients over medium-low heat for 5-10 minutes.  You might want to use an older pan.  I was able to get the mixture off after letting it soak for a while, but I would hate for you to ruin a pan if it burned.

2.  Once the dough has thickened and all the moisture has been absorbed, it is ready!

3.  Let your child(ren) go to town making new creations.  We played with our SandDough outside first beccause I wasn’t sure how messy it would be, but was pleasantly surprised.

4.  Store it in an airtight container/bag and get it out another day.  :)

  • Share This Post:
  • Share This Post on Facebook
  • Share this Post on Twitter
  • Email this Post

Safety Scissors Sea

I just got our Melissa & Doug safety scissors (70% off) I ordered last week and thought we would try them out.  We’ve never attempted cutting before and let me tell you…Big Brother is NOT a fan. 

After about 30 seconds of trying to help him hold the scissors correctly and cut this clever paper, he loudly told me that he didn’t like scissors.

So I ended up cutting them.  Oh well…we’ll try again in a month or two.

PS- I’m not sure why it automatically made my picture vertical when I uploaded it.  Sorry about that!

  • Share This Post:
  • Share This Post on Facebook
  • Share this Post on Twitter
  • Email this Post