I get writer’s block…some times more than others. I had a few days last week where I felt like my ideas had all dried up. That’s when I like to look through books and magazines for inspiration. In fact, I created a file for myself specifically for this purpose.
I opened up a book my mother-in-law bought for me at a garage sale called The Preschooler’s Busy Book . This is a wonderful resource, by the way. But I noticed something in the back of the book I hadn’t seen before…an appendix with recipes for homemade art supplies! So this week I’ll be trying out some of the recipes and sharing them with you. Enjoy!
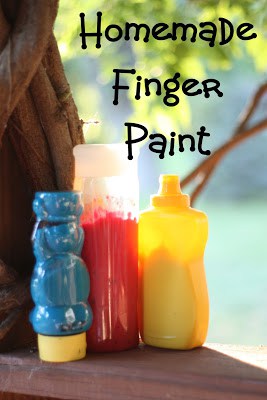
The first recipe is for homemade finger paint. There are three things I LOVE about this: (1) it costs about 50 cents total to make enough to fill 2 bottles, (2) it is made with flour, salt, and water so if it ends up in the mouth…no harm done, and (3) it can be kept in upcycled squeeze bottles to make it easier to use!
Recipe for Homemade Finger Paint
1 cup flour
2 tablespoons salt
1 1/2 cups cold water
1 1/2 cups hot water
Coloring: food coloring, tempera paint, or powdered tempera will work
 |
| 1. Mix 1 cup of flour and 2 tablespoons of salt. |
 |
| 2. Add the cold water and stir until there aren’t any lumps. |
 |
| 3. Add the hot water… |
 |
| …and bring to a boil. Once it’s thickened, remove it from the heat. |
 |
| 4. It will be kind of lumpy, so continue to whisk away until the lumps are gone. |
 |
| Getting smoother… |
 |
| 5. Dump half of it into a bowl and add your desired color of food coloring. |
 |
| Stir. |
 |
| 6. Pour into a squeezable container. I used a mustard container, a honey container, and a shampoo bottle! Depending on the size of the mouth of the bottle, you might need to use a funnel. Since it’s pretty thick, it will take some coaxing to get it through the funnel. :) |
 |
| Ready to paint! |
 |
| All business |
 |
| Try mixing colors! |
 |
| Big Brother discovered yellow+blue = green! |
 |
| I had intended for Little Brother to join in the finger painting fun, but he was too busy throwing an enormous tantrum! |
 |
| The book says to store it in the refrigerator…I have no clue why. But I’m a rule-follower, so that’s exactly what I did! |
I really loved the texture of this finger paint (yes, I enjoyed finger painting too…I just couldn’t resist). It dries with just a little bit of texture and is thick enough that it doesn’t fling all over the place. I think we’ll be finger-painting much more often now that we have paint that is ready to squeeze!
Related Posts
Car PaintingMy friend Rachel stopped by with her adorable kiddos (with Sonic drinks for all) while…
-
Paint with Tops A few weeks ago we made homemade spinning tops (which the boys are still having…
-
Homemade Art Supplies As summer approaches and you start thinking about the many arts and craft projects…
-
Homemade Face-PaintLooking for a fun new tradition to add to your 4th of July festivities? Why…
-
-


I have this book somewhere and forgot all about it! Thanks for posting this. :o)
I love this! I've wanted to try finger painting for months now, but my oldest STILL puts everything in his mouth and I was concerned about what would be in the paint. Thank you for sharing this!
I tried the one with cornstarch before and I think the color separates or becomes weird when not in refridgerator.
Ann
Ann, thanks for sharing! I had no idea why…but I was sure there was a good reason why the book said to put it in there. :)
I love this one! We'll be trying it soon!
We will try this recipe. Ours was too lumpy. Kind of like my gravy…and my mashed potatoes…
Now that I think of it, maybe it's not the recipe at all. Maybe it's just me =)
I just made it. the paint resembled gravy like texture..i think its me too!lol. my son still liked it.. aslo kept bsy enough that painting made him sleeply!
Great post…love the homemade art supplies. Did the fireworks craft with my two this morning and they loved it! If you run across a recipe for homemade bath crayons/paint please pass on. Although, as crafty as you are there may already be one on the site! Thanks for all you do!
I use this with my mom who has altzheimers…I can't use paints anymore as she wants to eat them. You need to put them in the fridge because will grow "science experiements" (mold) if you don't! I also make a new batch every month if we don't go through them fast enough.
Will be making these paints his afternoon. Thanks
http://www.everydayonpurpose.blogspot.com
oooo… i love it! especially the use of old containers… genius!
I have the toddler book by the same author and have made these paints many times. The kids enjoyed them very much! Never thought of refilling squeeze bottles…thanks!
That look so fun! I wanna come play at your house! :)
Love it! Thanks for sharing! I just hope everyone realizes that the yellow mustard container is not mustard!! lol
Primary Connections
Love it Jenae! I will definitely make this for my little ones! Thanks for sharing.
Without preservatives I'm guessing these don't last long without refrigeration
what could be used to preserve them from growing mold say if you were not able to keep in the fridge
I came over from MSM…thanks so much for the recipe – will have to try it! =)
I love it! I am planning on making a huge batch for my daughter!
Does the food coloring stain their little hands??
I didn't notice it staining his hands. Even if it does, it will be only slight and it will quickly wash away.
So very fun, AND easy, AND inexpensive. Can't beat that! Thanks for sharing.
I have a question: when we were little we finger painted on special paper–it was kinda shiny but not as shiny as waxed paper. Do you use that or regular paper? If you do, where do you get it? I can't wait to try this with my 4 and 5 year old.
We use freezer paper, use the shiny side. Much cheaper than finger paint paper.
I tape it down with blue painters tape. Love that tape, sticks well and extremely easy to remove, use it for everything. We have used the same piece for months to tape the frozen pizza box closed!
My daughter uses the freezer paper for one time stencils. Found in Walmart in with aluminum foil, plastic wrap, usually on the bottom shelves.
Hope this helps.
Jenae, thank you for this recipe. I bought some fingerpaints but the colors weren’t as vibrant as I would have liked. Perhaps using the paste food colors with this recipe, I can get a blue that is blue!
We actually painted on finger-paint paper this time…but only because I already had some on hand. You can use any paper, but it does help if it is a little thicker (like construction paper). The paint "glides" a little better on actual finger-paint paper because it is smooth and shiny.
You should be able to find it in the school supply section at Walmart or Target.
LOVE that I don't have to worry if it gets in the kids' mouths!
If not refrigerated it molds very fast, believe me!
Thanks so much for sharing this!!! i cant wait to make, gotta get some food coloring though !
Thanks so much! It really useful. going to try today
LOVE your site. I'm so glad I stumbled across it. Someone had linked something you did on pinterest (love that site too). I will be coming back often. A BIG thank you!!!
I made this today with my 2 boys, 4 & 20 months, we had fun and the paint came out awesome! Thank you for sharing.
I love this, but the big question for me, is it washable?!
hi, I have followed your great idea for a while. I really love this paint, I must try it. I stay in thailand.
I have bought finger painting once , it cost too much. This homemade paint must safe me o lot.
thanks
Great article. Thanks
I can’t wait to try this!
Thanks for posting this recipe! I want to buy the book now! I am so excited to finger paint with my kiddo now that it is edible paint! What a brilliant idea! She is already obsessed with an empty squeezable ketchup bottle so I am sure hours of fun are in store for us with this paint!
i used a food processor to make it really smooth. It was also really stinky so I put a couple drops of lemongrass essential oil in it and now it smells delicious.
Does it really need to be refrigerated? It’s flour and water .. neither of which rot. So I’m confused. Doesn’t matter anyway – there’s absolutely no room in our fridge. Guess I’ll see what happens.
Thanks for the post! We had loads of fun with it.
As a teacher I often find myself searching for fun ways to teach. Simple, green and frugality are key for me. Thanks for sharing the information. GTFD
i made the home made finger paints with the corn starch recipe… it turned moldy when left out! must be why this suggests to keep it in the fridge– glad to know i can make finger paints that won’t mold!!
This is a great idea! I was just wondering how many times you have grabbed the finger paint thinking you were grabbing the mustard? LOL
We just made this and it works great. I know why they say to keep in the fridge. I put mine in the paint box and when I went to get it the next day, it had the consistency of water. Oops.
I just made this for my boys to use :). I am in love!! Thanks for posting!!
After a few days if not in refridgerator it will get moldy. I know this because it happened to our homemade paint.
Thanks for sharing :)
i am planning my little girl’s 4th birthday coming up in august. we have a huge extended family who all expect to be invited and fed and in previous years i found myself dishing out hundreds of dollars just to cook out at home and do little fun things to entertain the kids. i am totally broke and trying to think of even cheaper ways to have fun so i thought huge roll of white paper in the yard and all the kids covered in finger paint. then we can spray ’em off with the hose when we’re done. does anybody know where do you buy those huge rolls of paper like i used to see in art class? and can i make this homemade finger paint in way larger portions (i’m thinking milk jugs) and how far ahead of time can i make it?
THANK YOU!!! :-)
I am going to have to try this with the flour! I tried making fingerpaint with corn starch and it did work, but I think it would be better with flour. I had a little more work getting it to a thick enough consistency with cornstarch. It was usable tho!
Thank you for sharing this :)
Just did this with my 16 mo daughter. Took no time to whip it together and she had a blast, even if only for 15 minutes :) Thank you!!
Excited to make this tomorrow!
Does the paint stain the kids cloths?
I’ve never had problems with staining. I am wondering how long they’ll last in the refrigerator.
I think the only way the recipe could be harmful is if a child with gluten intolerance ingests it.
what can we aadd to the cornstarch one to keep it from growing mold, say if we couldnt keep it in the fridge
I think adding cream of tartar or alum, both found in the spice aisle, can preserve the paint much, much longer.
Hi! I am looking forward to do this but im wondering if it will wash off clothing… i actually dont want it to. i want to have him and his friends paint tshirts at his birthday party. do you think this will work?
I used the shiny side of freezer paper and it dried up and flaked off. Should I be using the other side?
hey! thanks so much for this idea and cutie pictures! my son loved making the paints with me which made me happy because he has been a trouble maker lately, this was a good way to practice listening to directions and allowing me to help him which is nice he is very independent and does not want help. so thanks, you saved this housewife from a snowy boredom
I know this is an old post but would you say this recipe is better than the cornstarch? And how long is the paint good for? And does the food coloring have to be liquid or can it be gel?