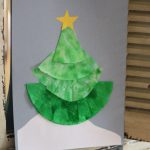
Coffee Filter ‘Stained Glass’ Pumpkins

Big Brother and I made these cute stained glass pumpkins yesterday and they are now gracing our presence above the kitchen sink. We really enjoyed making these together, especially since they involved two things Big Brother LOVES to do…color and spray water!
Here’s what you’ll need: coffee filters, markers, scissors, a glue stick, a spray bottle with water, and either a laminator or contact paper.
Get your orange markers ready…we used regular markers, fine tip markers, and do a dot markers.

Start coloring directly on the coffee filters! Big Brother chose to use the regular markers and I wanted to do a polka-dotted pumpkin…

(You’ll also need to use one coffee filter for green and brown (for the stem and leaves) as well.)
Get your spray bottle ready and gently spray the coffee filters. Keep in mind that a little water goes a long way! If you spray it until it’s soaking all the colors will seep out onto the plate in the water instead of absorbing into the coffee filter.


Let the coffee filters dry. Depending on how wet they are, this could take anywhere from 1-6 hours.
Once they’re dry, cut the green section in the shape of the vines and the brown section into the shape of the stems.

Use a glue stick to secure them into place.

You have two choices for “sealing” the pumpkins. You can either sandwich the pumpkins between two layers of contact paper (sticky sides together) or you can use a laminator. I have this laminator and use it all the time. I buy the generic laminating pouches from Sam’s because they are MUCH cheaper than the Scotch brand! I opted to use the laminator since the final product looks nicer and tends to stay protected better…plus, I’m planning to keep these for next year too.


Secure on your window with a little clear tape and you’ve got a lovely fall decoration!


I think I found the art project we are doing tomorrow!!! Thank you for all the ideas and inspiration you give me to help my child learn. What a blessing!
This is such a fun, easy craft. I love it.
My sister in law has that laminator and we love it. Too bad I just returned it to her this week.
So cute and fun!!!! I have that laminator too…..going to look at Sams tomorrow for the sheets. Thanks for the tip.
Hayley
http://www.iheartmyworldblog.com
Would the watering also work with a wet paint brush? I assume so we will try it and confirm. My son can’t spray yet his hands are not big enough.
I think it should, although it might smear the colors a little bit (which is totally fine). Try it and let us know! :)
It worked great! Looks like tie-dye but it’s neat. He loved it, especially the water and paint brush. It was his first real use of the markers that was also fun, he’s 26 months, btw.
I had him do all blue ones too that I’ll cut into snowflakes for Christmas decorations :)
Thanks for the nice activity :)
P.S. I posted a pic on your facebook page :)
We are going to try this!! Thanks for the idea! :)
Super cute idea – my girls will love doing this on Monday with Daddy – a special Halloween treat since he does not get to participate in our crafts very often! Love Valerie L’s idea of snowflakes!!
We did this yesterday after reading your post. Ours didn’t turn out exactly like yours, but love the idea and the fun the kids had. I posted and linked to your blog here. http://familymorsels.blogspot.com/2011/10/coffee-filter-pumpkins.html
Having read this I thought it was extremely enlightening.
I appreciate you finding the time and effort to put this informative article together.
I once again find myself spending a significant amount of time both reading and
leaving comments. But so what, it was still worthwhile!
Great delivery. Sound arguments. Keep up the good spirit.
hello!,I really like your writing very a lot! share we
keep in touch extra about your article on AOL?
I require an expert in this area to unravel my problem.
May be that is you! Looking ahead to peer you.
I was suggested this blog by my cousin. I’m not sure whether this post is written by him as no one else know such detailed about my trouble. You are incredible! Thanks!