Easy String Art Christmas Tree Ornament

These cute, little string art Christmas tree ornaments make a great gift or keepsake ornament for your own Christmas tree. Your kids can even get some fresh air while they go out to hunt for the perfect sticks to make their tree. I’d recommend this craft for preschool up to adult, but adults should do the hot glue work with younger kids.
Here is all you need to create your own String Art Christmas tree ornaments:

- Dry twigs or sticks
- Yarn (We chose green, but a different color could be fun, too!)
- Hot glue gun
- Sparkly gold or silver card stock for the star
- Pen
- Scissors
- Craft glue that dries clear (We used Tulip Appliqué Glue.)
- Toothpicks
- Sequins for “Ornaments” (Small gems or pom-poms would work, too!)
First, take a walk outside with your kiddos to find some dry sticks on the ground. You don’t want to take any off trees as they might have too much moisture in them to snap easily. Break the sticks into the sizes you want for your trees. A great way to break them off and control the sizes is to hold one end of the stick firmly against a counter or table with the other end sticking out over the edge. The part of the stick you are holding down should be the length you want. Just snap off the end of the stick hanging off the edge of the counter or table. You should get a fairly clean break.

Next, arrange the sticks into triangle tree shapes. This can be fun for kids to play around with. Then, hot glue them together at the corners with a smaller, thicker twig in the middle at the bottom for the trunk.

Draw or trace stars on the back side of your sparkly card stock so you have enough for each tree ornament you want to make. Cut out and set aside.
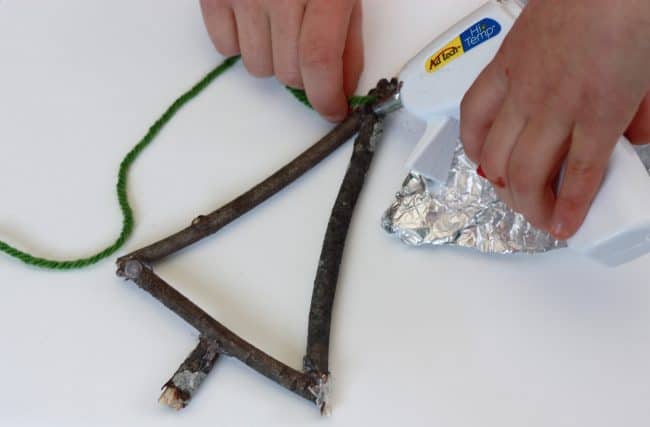
Find which side of your stick tree that has the most glue sticking out at the corners and make that the back. Hot glue the end of the yarn to the top of the tree at the back.

Next comes my seven-year-old’s favorite part! She got to try hot gluing under close supervision, and loved it. Run some glue along both sides of the tree as shown. It will dry before you start wrapping the yarn, but that’s ok. The glue is just there to provide some grip to the yarn when you wrap it, as it tends to want to slid up to the tip of the tree.
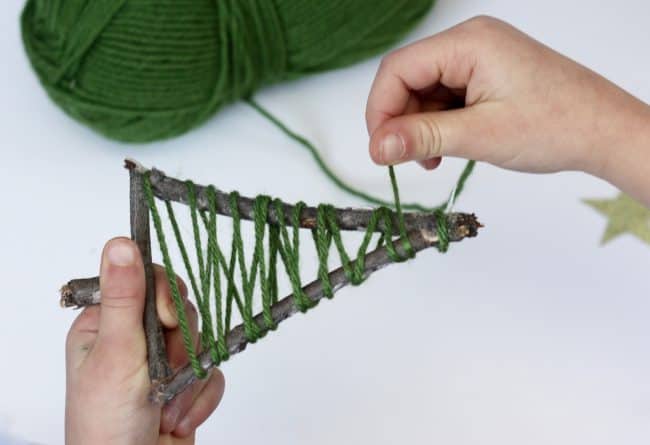
Start wrapping that yarn! Go up and down the tree to achieve a look you like. My kids had a tendency to wrap it too loose, so make sure they wrap the yarn tight enough to stay put. If the yard does still slide up the tree, unwrap a bit and put a little dab of hot glue on the spots that are sliding before wrapping it back up.
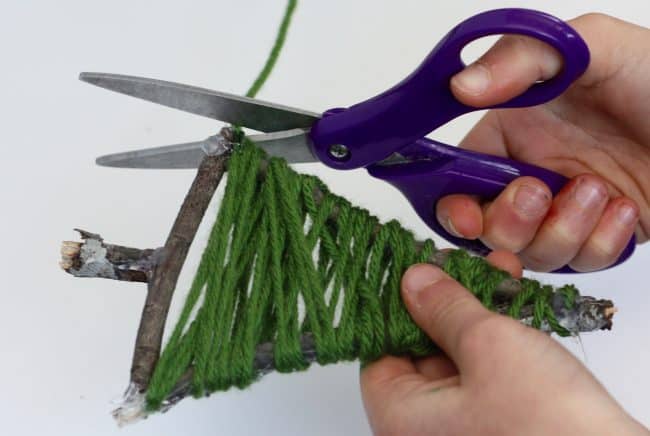
When you like the look of the wrapped yarn, snip it off with a scissors and secure the loose end with hot glue. Make a separate loop out of the yarn and hot glue it to the back of the tree near the tip.

Now for some decorations! Flip the your tree over to the front and use hot glue to attach the star you cut out earlier. Use the clear-drying craft glue to put “ornaments” on your tree. We used a pack of sequins, which came in three sizes from Michael’s craft store.
Use the tip of a toothpick to dip into the glue, and dap that glue onto the yarn. Stick a sequin (or whatever you decided to use as ornaments) onto the dab of glue. Use a clean toothpick to push it down. Repeat as many times as you wish. My preschooler tried each size and decided the big ones worked best, so I’d recommend the larger size sequins to reduce frustration for the littlest hands.
Whether you and your children (or students) make these trees as gifts, or just a fun decoration for you own home, I know they’ll be treasured for years to come!
Merry Christmas!