Homemade Musical Instrument

Both of the boys have had so much fun playing with their musical instruments. This is really multiple instruments in one…it acts as a maraca, a tambourine, and a drum. Talk about versatile!
A word to the wise: Don’t let this instrument be at the bottom of a dog pile while wrestling, lest it will crack. ;)

Here’s what you’ll need: 2 clear plastic plates, colored pom-poms, small colorful beads, and a glue gun.

1. Place a plate on the counter and then put all the “goodies” on the plate. We used colored plastic beads and pom-poms.

2. Place the other plate on top upside-down. Carefully hot glue the edges (without your children’s help, of course). Let dry until hot glue is no longer warm.

Let your little one explore!

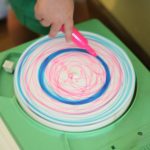
Performing on their “stage” (aka, the coffee table).

“The wheels on the bus go round and round…”
 Patting their new colorful drums!
What’s your favorite homemade musical instrument???

My son will LOVE this! Thanks for the inspiration.
I like to put beads, rice, beans, or other small things inside empty spice bottles for a maraca/rattle. I also like putting rice between two aluminum pie plates for a tambourine effect.
We have made kazoos out of toliet paper rolls and wax paper before. Pretty much anything that makes noise is a hit in this house… but I’m really loving the colors on this! I’ll have to give it a try! thanks!
We love to make “shakers” with beads inside empty spice containers. Love the blog and the coffee table, we have the same one!
Do your kids like to jump off of it like mine do? It’s no longer just a coffee table…it is a trampoline and a launch pad. *Sigh*
What a great idea to use clear plates! I’ve seen it done before but always with white plates and something like jingle bells or beans. These are pretty as well as fun! Your kids are beautiful, and I love the older one’s shirt!! I’m pretty much in love with Sesame Street :-)
this is so clever and beautifu. MUST make for mine. Thanks for sharing!
Such a simple yet wonderful idea! The clear plates and colorful stuff make these beautiful too!
Oh… and we have the same coffee table as well. Not only does my daughter like to jump on it, but the dog does as well.
My husband is a worship leader and recently for a church service the children were all included. One of the best instruments used was “homemade.” We took easter eggs and partially filled them with dried beans (red and split pea) and taped them to keep secure. They are perfect for little hands to hold and make a great percussion sound.
I LOVE this!
I always loved making shoebox guitars. Take a shoebox with lid, cut a hole out of the lid and then put lid on box. Take 4-5 rubberbands and stretch them around the shoebox making sure they are over the hole. Now, strum away!!
Hi I been following your fantastic ideas for everything and I have to 9im really excited to be making some of your ideas. I am inn the process of workin with children with additional needs and its great to see. ☺