Stoplight Beanbag Toss
This is a super-easy activity that teaches colors too!
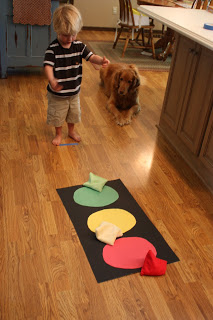
Here’s what you’ll need: 3 pieces of construction paper (red, yellow, and green), a piece of cardboard or posterboard, and bean bags (I didn’t have any, so I stole some beans from our sensory tub and made these in less than 10 minutes with some scrap fabric–and I am NOT crafty AT ALL).

1. Cut the shapes into large circles. If your child is able to use scissors, draw a circle on each of the papers and let her cut them out. I folded all 3 pages of construction paper and cut them at once, to make sure they were the same size.

2. Cut your cardboard/posterboard into a rectangle.
3. Glue the circles onto the cardboard rectangle. The red goes on top, then yellow, then green. As you can see my “circles” are actually ovals…oh well!

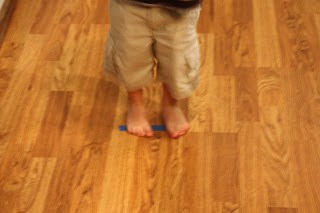
4. Mark a “standing spot” on the floor (I used a piece of tape).
5. Once the stoplight is dried, let your little one try to toss the beanbag onto the corresponding color while it is laying down flat (with an underhand throw). If your beanbags aren’t the same colors, just shout out a color for them to try to toss it on. I was a little surprised how difficult this was for Big Brother at first. After some modeling, he was able to throw it underhand. Adjust this activity to the development of your chid.
6. Pick up the stoplight and hold it upright against you. Have your child try to throw the beanbags overhand to hit the corresponding color.
This was a big hit with Big Brother…he absolutely loved it! And we got to review what the different colors on the stoplight mean.

I can do this one with my son.
very cute!
Hi, There are some lovely ideas on your blog. I'm looking forward to trying some out with my 2-1/2-yr-old son. Thank you for sharing.
♥ Your book suggestions are amazing ♥
What a great and easy idea! I know for sure my son is going to love it! I love how the dog is watching the game, so cute : )
My son will love this!!
I like this idea. Did you sew the bean bags or glue them? Im not very crafty either.