I have had this idea from Lori Danelle bookmarked on my computer for a couple of weeks. I have been wanting to make it, but didn’t want to go to all the effort or drag my sewing machine out (plus part of the instructions say to “surge the edges” and I honestly don’t know what that means or how to do it…yes, I’m a sewing-school dropout). So, I put my grand intentions on hold out of shear laziness.
Fast-forward to Thursday night when we stopped by Lowe’s to pick up something for Prince Charming to fix a sprinkler. I happened to meander past the Clearance section (as I’m prone to do), where I saw the Director Chair Covers marked down to $0.62 (regularly $4.97)! Whenever I see a deal that good, I always wrack my brain for ways to use it. There happened to be a package already opened that I was looking at when I realized that these would be absolutely PERFECT for the hanging bookshelf I wanted to make…and I wouldn’t have to sew a thing!
The best part about it is, I spent less than $20 on EV-ER-Y-THING!
You can buy the chair covers online here for $0.62 once you add them to your cart and enter your zip code (it will show the price as $4.97 until you put in your zip code). If your local Lowe’s has them available, you can even pick them up for free!
So, here’s what you’ll need: 4 director’s chair covers (of the same color, or 2 of each if you want 2 different colored ones). a 36″ long metal pole that is 1/4″ thick (in the hardware section–it’s kind of like re-bar), 4 double-rod brackets (in the window hardware section), duct tape, pinking shears (aka-zigzag scissors), scraps of fabric, ribbon, and a hot glue gun.
(If you can’t find the chair covers but know how to sew, I suggest you use Lori Danelle’s version here).
(And don’t get the idea that I’m handy just because I referenced the “hardware” section–I can assure you, I AM NOT.)
 |
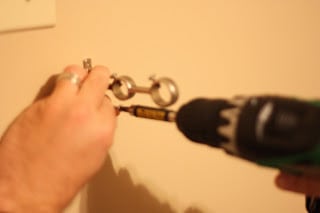
| 1. Slide the old “dowel” rods out of the chair cover and insert the new ones. You will two use two chair covers and 2 rods per hanging pocket. |
 |
| 2. Push the two chair covers together until they are touching and almost perfectly lined up. Then add some duct tape down the seam…did you know that duct tape now comes in patterns like leopard print??? Don’t worry…this part won’t show. The only purpose it serves is to keep the two chair covers from sliding apart. |
 |
| 3. Repeat the last two steps with the other two rods and chair covers. |
 |
| 4. If you want to add a banner, use a straight-edge to draw a triangle onto a piece of cardstock (if not skip to step 9). |
 |
| 5. Trace the pattern on the backside of the fabric and use the pinking shears to cut it out. The zigzag cut that the pinking shears make keeps the edges of the unsewn fabric from fraying. |
 |
| 6. Continue cutting the remainder of the triangles. Lay them out how you want them to be positioned on the hanging bookshelves. |
 |
| 7. Once you have the triangles placed in the exact location you want, fold down the top inch and put a steady line of hot glue. Immediately press down. Continue for all the triangles. |
 |
| 8. After all the tops of the triangles are glued on, lay your ribbon on top. Position it the way you would like to be, then use the hot glue gun to glue small sections at a time. Make sure to make your ribbon long enough to wrap around the ends. Repeat on the second hanging bookshelf as well. |
 |
| 9. Mount each double rod bracket into a stud (if possible) using a screwdriver. |
 |
| 10. Attach the hanging bookshelves and you’re done! |
 |
| I also hot-glued some foam balls on the ends of my rods since my children are still really young (I didn’t want an eye getting poked out!). |
Now…wasn’t that easy? :)


Very cute and VERY smart Jenae!!!! I forgot that not everyone has their sewing machine out for easy access at a moment's notice. Love it when an idea takes on a new life and becomes more usable for a wider range of people!!! :)
They don't have chair covers in my area for $0.62 :o( otherwise, this would have been cute in my boys room!
My boys are too old for this but I think it is very cute! I keep my sewing machines set up but sometimes opt for the hot glue gun too.
The lowest I can find the chair cover in the metro Atlanta area are $1.24 each and every store does not have these on sale. Some only have certain colors on sale. I wanted to buy several for a long row of shelves for my daughter's new room and then several for the homeschool room. I've been looking for cheap, but cute, bookshelf ideas and this is awesome. Thanks for sharing an easy way to make these. I can sew but honestly just don't have time right now and this is a great price for fabric (even at $1.24 each).
I got them in red for $1.24 and I am thrilled!!! There are SO many books in stacks all over the house and these will come in handy! Can't wait to go to lowes today! Thanks!
Ps. I saw this on moneysavingmom.com :-)
Where do you live that any sale has items under a dollar!?!? Jealous! Our Lowes has them for 1.75
I saw this on Lori's site and loved it as well (but don't own a sewing machine). Thanks so much for sharing!! Very cute and clever.
I looked up the director’s chairs. They are only in red. =( My daughter’s room is pink and green.
Okay, so what if I bought fabric to match her room, and used safety pins around the dowel rods? I can use the rest of the “no sew” directions from there. It would be easy to hot glue the ribbon OVER the safety pins so they won’t show.
Anonymous, that's weird-I searched for "director's chair cover" and there's black, tan, red, green, blue and white.
This is a genius idea, thanks!
Wait, I have a confusion. What is the 36" metal bar supposed to be for? Are the dowel rods already in the chairs, or is the 36" rod what you meant by dowel and if so do I have to get 4 of them? I am a little crafty challenged, so any help here is appreciated!
Kestrel,
The chairs come with an individual dowel rod already inside. However, since we're hanging 2 side-by-side, we need 1 long metal rod (don't get a wooden dowel rod because it won't be strong enough). If you're making 2 bookshelves (like the ones shown), you'll just need 2 36" metal rods.
And I am VERY craft challenged…so I understand your pain! :)
I tried to buy the covers today online to pick up in the store and they called back telling me that the covers were sent back to the manufacture. The lady who called didn't know why. So bummed! I was really looking forward to this SIMPLE project!
So smart of you! I definitely want to make one of these for my little man. I saw you featured over at One Pretty Thing and I am so glad I stopped over! I am just starting to try to get a bit more organized in what I am "teaching" my 1-year-old and your site is wonderful for ideas! Thank you!
Your slings came out cute! In case any of your readers do sew, here's a link to the original tutorial I wrote about two years ago for making a book sling:
http://pennycarnival.typepad.com/penny_carnival/2009/02/tutorial-hanging-book-display.html
And in September Family Fun magazine ran a no-sew version of my project:
http://familyfun.go.com/crafts/book-sling-919473/
Take care!
nice idea…& tutorial as well…thanks
brilliant! just love your version, and would be so pleased if you'd come over to my crafty linky party and share this and/or any other projects. hope to see you there!
Immediately after I got this in my feed, I ordered them online. Picked them up from Lowes today! I'm going to turn them into a hanging diaper holder for my playroom! Thanks for the tip and the idea!
I made my diaper holder and am posting it today with a link to this post. Thanks again!
I saw this post the other day, and it got me thinking. So I ordered a bunch online in various colors. I'm making some for the kids rooms, our playroom and I'm going to make a half sized version to hold magazines in the restroom.
Those are great and would be such a fun idea in an office!
I ADORE this!!! Thanks for sharing!
So cute! Thanks for linking it up to A Handmade Christmas!
Some time ago, I really needed to buy a car for my firm but I did not earn enough money and could not order something. Thank heaven my brother suggested to take the loans at reliable creditors. Thus, I did so and used to be happy with my college loan.
What a fun bookshelf! I am sharing this on Pinterest.
How nice this bookshelf.. Absolute 1 share must be for this…!