Making It Rain: Rain Cloud In A Jar
Making It Rain
Due to Big Brother’s fascination (and fear) of various types of weather, I thought now would be a great time to start a new Weather Thematic Unit. We’re not forecasted to receive any rain for the next couple weeks around here (which we desperately need), so perhaps our little experiment will rub off on the weather!
This water cycle project idea (and many others that we’ll be trying) came from Weather Wiz Kids. Take a look at the site (created by a meteorologist), it’s got tons of great ideas!
How To Make It Rain
You will need:
- glass jar
- plate
- water
- ice cubes
What to do:
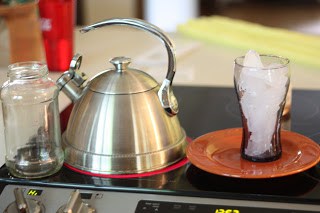 |
| 1. Heat your water until it is steaming. |
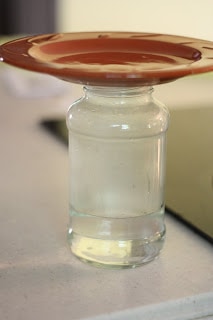 |
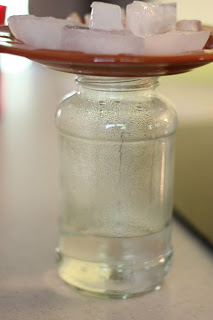
| 2. Pour the hot water into a jar until it is about 1/3 filled. Put a plate on the top of the jar. Wait a minute or two before the next step. |
 |
| 3. Put the ice cubes on top of the plate and watch closely to see what happens inside the jar. |
 |
| 4. Streaks of water will run down the side of the jar, making rain! |
This rain in a jar activity would probably be more appropriate for children who are slightly older, but Big Brother enjoyed it (for about 20 seconds, anyway). :)
Can Your Science Explain Why It Rains?
Wonder what makes it rain… Go here under “explanation” to find out!
This post was first published June 2011. Updated 2018.
Literature Link
Click here for more easy science ideas:
How To Make A Homemade Lava Lamp
Oobleck Recipe: Liquid or Solid?
Awesome Science Fair Project Ideas for Kids

This is great we did something similar, except we made our ice blue! Come by and check it out http://habeebeehomeschooling.wordpress.com/2011/04/27/indoor-rain/
Awesome project, found it on Pinterest. I have it pinned for a project tomorrow and that post will go up next Monday. I always link back to the “pin” but if you like I will link directly here. Just let me know =)
We are in a drought and burn ban. Going to do this tomorrow after church since we need some lol.
I am sorry that you did not have a good experience in school, but many teachers I have the experience of knowing do teach this way.
How neat! I think that I will do this with my children, nieces, and nephews! :)
Thanks for the idea! We tried it and I blogged about it today and linked up to this page too! Please come check out my post: http://savegreenbeinggreen.blogspot.com/2013/03/kids-crafts-inspired-from-pinterest.html
that was the worst ever it didn’t work at all.
You need to look at the bottom of the plate inside the jar. Look closely, as water vapor condenses to form water droplets on the bottom of the plate inside the jar. For more of a visual instead of a plate put plastic wrap over the top of the jar and seal with tape or a large rubber band. You will really see the condensation on the plastic wrap. Do not be so quick to judge until you fully understand the experiment. This one does work and it teachers the water cycle process.
You need to look at the bottom of the plate inside the jar. Look closely, as water vapor condenses to form water droplets on the bottom of the plate inside the jar. For more of a visual instead of a plate put plastic wrap over the top of the jar and seal with tape or a large rubber band. You will really see the condensation on the plastic wrap. Do not be so quick to judge until you fully understand the experiment. This one does work and it teaches the water cycle process.
what a cool idea…..
This was the worst experiment ever. You don’t even need the ice, it is just the water from the steam rolling down the sides of the glass jar.
This is totally cool! I am pinning it to our Donald Crews Virtual Book Club for Kids Pinterest board. I’d love for you to come link it up in our Donald Crews blog hop if you have a sec http://www.toddlerapproved.com/2013/08/alphabet-train-matching-activity-for.html
Wonderful website you’ve got here.
So cool. I have it down for this weeks letter of the week science project. R for Rain.
That’s so cool!
Hi Jenae! I love this project for teaching about part of the hydrologic cycle. I put a link to it in my latest blog post to share with my readers (thank you!!). I love your blog!!
Can I microwave the water? We can not have hot plates in the classroom…
This was the worst experiment ever. You don’t even need the ice, it is just the water from the steam rolling down the sides of the glass jar.
I think that I will do this with my children. Thank you so much!
Kids will love it.
I think it is a good experiment. A good idea is to place a long handled metal spoon into the jar, before pouring the hot water into the jar. The metal spoon will take the heat, instead of the jar, and help to prevent the jar from cracking with the hot water.