
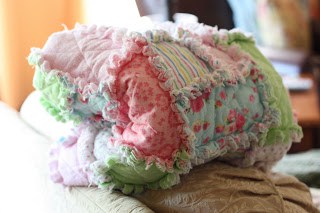
Several years ago, the girls at our church began making these quilts for each new baby. A baby boom occurred soon after, so we began limiting it to the firstborn child of each family (simply because the two of us who had sewing machines couldn’t keep up). I think I have sewed probably around 25 of these quilts in the last 6 years or so. We too were blessed to receive one of these beautiful quilts from some wonderful friends at Big Brother’s baby shower.
Please note: Just like any loose blankets, these rag quilts should never be used in a crib with a newborn baby. They make for a great tummy time blanket (especially if you have various textures) or play blanket.
The great thing about rag quilts is that they are very forgiving. If your pieces aren’t cut exactly right, that’s okay! You won’t even notice because there is a one-inch seam that allows for lots of mistakes! A couple years ago, a good friend and I took a quilting class. Although it was super-fun because I had amazing company, I soon realized I was in over my head! I kept trying to take the shortcuts I am used to taking with rag quilts and quickly found that regular quilting requires near-perfection. Since I’m not a perfectionist in the least, I think I’ll just stick with the taggie blankets and rag quilts from now on!
Although they take quite a bit of time to make simply because all the steps, they are really pretty easy. And the end product is totally worth it! They’re a perfect way to start off learning how to sew (after the taggie blankets, of course).
Two of my best friends from childhood recently had their first babies–one friend had a boy and the other had a girl. Since these friends will always be super-special to me, I wanted to make their sweet babies something special as well!
Here’s what you’ll need:
- About 8-9 yards of coordnating fabric (I like to use flannel because it “rags” well, but cotton fabric works well too…I would suggest using at least 6-7 coordinating fabrics with a couple solids)
- Batting
- Multi-purpose thread (I always just use white, no matter what)
- Sewing machine
- Rotary Cutter
 *
*
- Rotary Mat
 *
*
- Quilting Ruler
 *
*
- Pins
- Sharp scissors that can cut through several layers of fabric
*If you don’t have and don’t wish to invest in a rotary cutter, mat, and quilting ruler (which will make your life so much easier), you can simply make 6 sizes of patterns (3 for the fabric, 3 for the batting) and use scissors to cut them out. It will take MUCH longer this way, however.
Sizes of squares and rectangles:
Fabric (2-sided: cut 2 layers at a time and then put the wrong sides together): 9″ x 9″ square (21 count), 5.5″ x 5.5″ square (42 count), 9″ x 5.5″ rectangle (21 count)
Batting: 7″ x 7″ square (21 count), 3″ x 3″ square (42 count), 7″ x 3″ rectangle (21 count)
Instructions
I’m writing this all from memory (I don’t have a pattern), so if it seems I skip a step or my instructions don’t make sense…leave a comment and I will clarify!
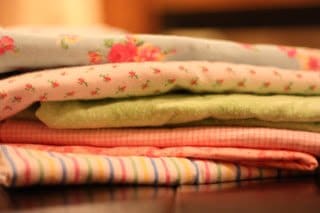 |
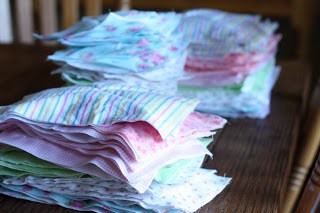
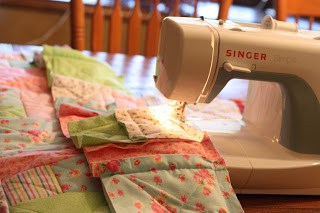
| 1. Gather your materials (and bask in the beauty of coordinating fabrics)! |
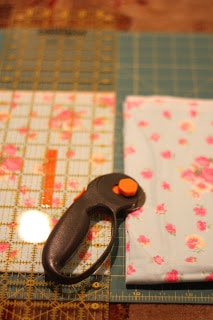 |
| 2. Use your rotary cutter, mat, and quilting ruler to cut out the fabric into the squares and rectangles. I kept my material folded together (so that I was cutting through 2 layers at once). Plus, it’s easier once you go to the next step if the pieces are already sandwiched together (with right sides facing out). You will need to cut 21 sandwiched 9″x9″ squares, 42 sandwiched 5.5″x5.5″ squares, and 21 sandwiched 5.5″x9″ rectangles. Make sure to cut various sizes of EACH fabric (DON’T cut one whole yard the small squares, etc. because it won’t look right when you put the quilt together. |
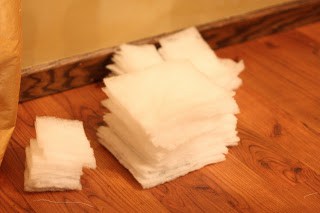 |
| 2. Then cut the batting (again using your rotary tool, mat, and quilting ruler). You will need 21 (7″x7″ squares), 42 (3″x3″ squares), and 21 (7″x3″ rectangles). |
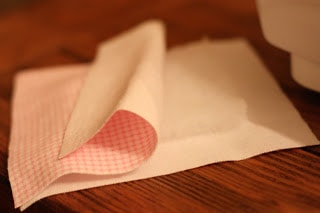 |
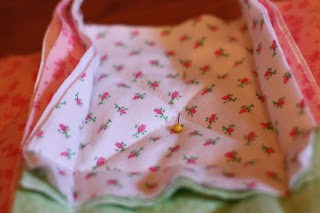
| 3. Place the batting centered between the two pieces of fabric. Remember…the RIGHT SIDES SHOULD BE FACING OUTWARD. You could pin it (if you want)…but I’ve found they normally hold together pretty well without pins (or maybe I’m just lazy). |
 |
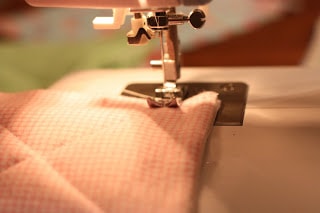
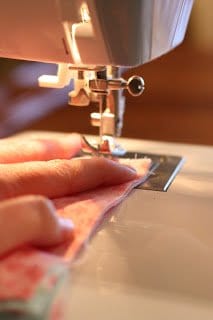
| 4. Sew an “X” through each square/rectangle with the batting in between. It’s your choice whether or not you want to backstitch. I normally do (out of habit), but it’s really not necessary. |
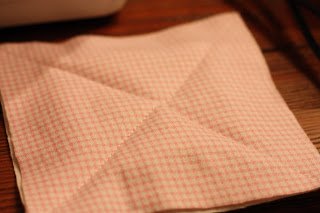 |
| See? |
 |
| 5. Place each size of squares/rectangles in their own piles. |
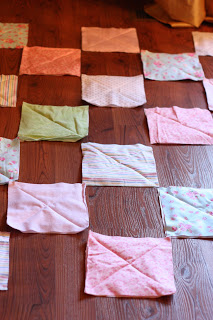 |
| 6. Then clear a large area (on the floor) to begin laying out the pieces. Start by placing the 9×9 squares in a checkerboard pattern with 3 large squares in each row (for a total of 7 rows). |
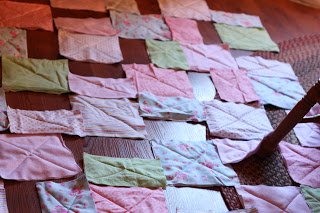 |
| 7. Then add the rectangles (making sure that fabrics of the same pattern don’t touch). Place one of the rectangles in each “empty” part of the checkerboard. |
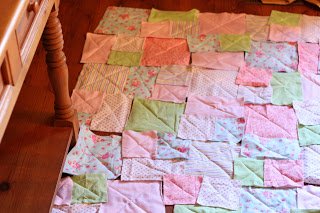 |
| 8. And finally add the small squares. You’ll use 1 rectangle and 2 small squares to make the equivalent of one large square. |
 |
| 9. Begin sewing each row together, leaving a one-inch seam. You’ll want to sew the rectangle and 2 squares together first and then sew those together with the large squares. |
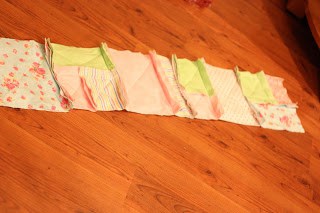 |
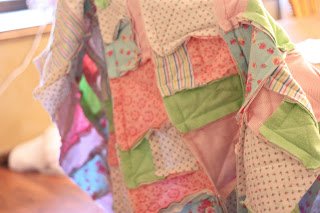
| See? One row done! |
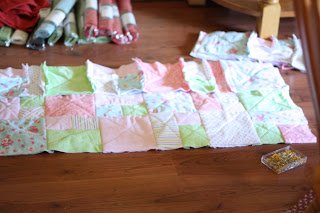 |
| 10. Once you have 2 individual rows sewn together, you’ll want to use your pins. Place the top row with the seams facing down (touching the ground…not as shown in the picture). Then place the second row on top of the first and line them up. Pin them together (about 1 pin per large square is sufficient). |
 |
| 11. Begin sewing, again leaving a one-inch seam, down the entire length of the row. Make sure you backstitch this time! Continue with steps 9-10 until all 7 rows have been sewn together. |
 |
| 12. Then sew around the perimeter of the quilt, leaving one inch on each side. |
 |
| You’re done sewing… I didn’t take a picture of the backside, but it WILL NOT be ragged, it will just look like a plain quilt. |
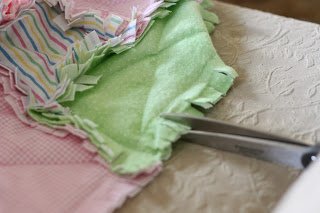 |
| 13. Now it’s time to rag! Cut each layer using a pair of very sharp scissors about every 1/4″. It’ll take a while. Pop in a movie and get to work (but take a break for your hands in between). :) |
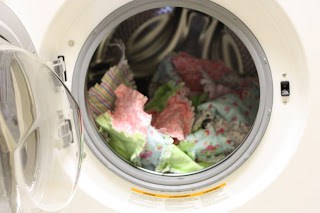 |
| 14. Wash on the “gentle” cycle and then dry on “low”. Be sure to clean out the dryer vent afterwards. |
That’s it! Now you have a wonderful keepsake to bless friends and relatives with!
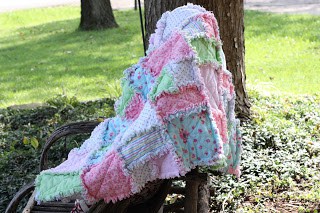 |
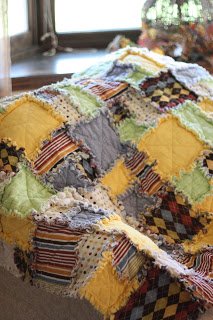
| You’re seeing green! I made these back in October and am JUST NOW getting to posting it. :) |
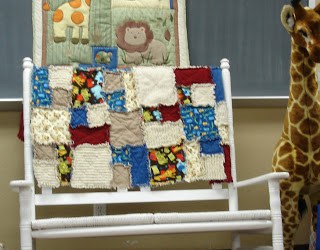 |
| This is the quilt that our sweet friends made for Big Brother. |
Click here for more ideas for baby:
Baby Shower Decoration Ideas On A Budget
Best Baby Toys
Baby Percentile Calculator
Best Bible Story Books For Baby
Baby Girl Nursery Ideas
Cutest Dollhouse Bookcase (with plans)
Taggie Blanket For Baby
No Bake Lactation Bites
New Big Brother Gifts
Related Posts
-
-
-
Baby BouncePost by Contributing Writer Jennie Everyone loves a happy, bouncy baby, right?! If I could…
-
-
-


Oh, I think this will be the first quilt my girls make, thanks for showing how you did this.
Oh they look wonderful! It'll be on my to-do list for whenever we have another baby! So adorable- thanks for sharing :)
Jenae! I love this quilt! And you did a great job explaining how to make it! I am getting ready to make little boy bedding for our new addition and this is perfect!
Be careful with baby’s on the loose string that sheds on rag quilts. If they chew on blanket, they might choke.
Yes, great explaination! I'm itching to make one of these now.
This looks beautiful! And easy even for a novice like me. Thanks for posting! I just found your blog and love it :)
One dumb question- does the back side look the same too??
Angie,
That's not a dumb question at all!
No, the backside will just look like a normal quilt. The front side will be the ragged side.
First, thank you. I made taggie blankets using your instructions and that was the first time I ever opened the box of the sewing machine my mother gave me for x-mas one year. Only my 2nd time ever sewing and they turned out fantastic!
I am not sure that I fully understand how to sew the rows together. Are the two rows laid on top of one another back to back? Is it where you have the seams facing the ground and one facing up? Then, sew the rows together leaving a seam?
How big is the blanket when finished?
Jenae,
Little Lewis LOVES his blanket you made (the 'boy' one pictured above). We use it everyday from tummy time or to wrap him in it as we swing on the front porch. It's perfect! This was truly one of the best gifts we received.
Benefits of this type of quilt:
-it can be thrown around and 'really used' and it doesn't look worn.
-you can spill something on it and it won't show because it's so 'busy'.
-It's cozy.
-I love the ragged side!
Thank you for posting the directions on how to make one myself.
We love you.
Love it! Definitely adding this to my list of projects to complete! Thanks for sharing!
I'm also wondering what the dimensions of the completed quilt are?
Kirstin,
You are exactly right! The side with the seam faces the floor while the other row's seam side faces up. So basically, you're sewing the two non-rag sides together.
Mandy,
I'm honestly not sure of the actual dimensions. I would guess it would be something like 36"x42" (based on very rough math calculations), but I'm really not sure. I've never actually measured a completed one!
how many different fabrics (patterns/colors) do you recommend using?
I would recommend using at least 6-7 different patterns (that coordinate, of course). And I normally try to use at least 2 solids so that the blanket isn't too busy.
I saw this post last week but didn't mark it and tried to make my ragged quilt by memory. I didn't take into account the seam allowance and came up with a smaller version, but I love it! I will make my next one following your directions. Thanks for sharing!!
Well, I'm planning on making a rag quilt for baby #2, and when I googled it, you popped up. :)
This is my first quilt. I am making it for my sisters baby shower! I purchased the fabric and have begun cutting, however I am a little confused about the number of squares and rectangles I am supposed to cut. It seems like if I have to double up on each size of my fabric pieces to make the front and back of the quilt I would only need HALF that amount of batting since I won’t be doubling up on that. You specify 84 pieces of fabric AND 84 pieces of batting. Is this correct? And if so could you explain it to me!! :) Do I double up on the batting for each fabric piece?
Hi Ruth,
The cut squares are actually intended to be 2-sided (as that is how I cut them). So basically, you’re cutting 168 pieces of fabric (front and back) and 84 pieces of batting. Sorry if that didn’t make sense. The quilt will be 6×7 squares. 1/2 of those will be the large squares and then half will be made up of one rectangle and 2 little squares.
Hope this helps!
My daughter got a wooden doll bed for her birthday. I’m going to scale down your pattern and use it to make a little quilt to go with it. Great tutorial…love the photos…makes the directions clear.
Thanks so much for the detailed instructions! I just bought my flannel and I’m looking forward to starting. Did you prewash your fabric? Normally I would but I was thinking that maybe you didn’t in order to get the ragged look when you do wash it when it’s done. Thanks!
No, I did not prewash the material. I never do, which is why I love the rag quilt…you can cut corners (like this one) and it still comes out wonderfully! :)
Thank you so much for explaining in such great detail! I can’t wait to make one!! I’ve been working on a hand sew quilt – every stitch by hand for the past few years! I started it when my son went to Iraq. He really helped me to get thru that tough time!
I make these all the time but I use old jeans for the top and flannel for the back. I cut all my fabric into squares (6 1/2″) and I do not put the quilt batt in. They are warm!!!! I usually just use one fabric for the back, but do cut it into squares. When it comes time to sew, I just sew a piece of jean and a piece of flannel together, then proceed as you do, making rows and then sewing the rows together.
I do the same!! Use old jeans, cut them into 6″ squares–then I cut 6″ flannel–my husband loves to put a quilt on his recliner–he says I need to make sure to put the pockets in the quilt so he can put his remote in it. LOL
One question, you mentioned this was for a baby, approximately what size is this quilt using the dimensions for the squares you provided? I’m looking to do a larger quilt so I need to know how many more squares I’ll need. Knowing what size this quilt is will help. Thanks
It ends up being approximately 3 1/2 by 4 feet, give or take. :)
I want to make this as a twin bed quilt for my little girl. What are the finished demensions of your quilt? Trying to figure out how much to increase it.
Approximately 3 1/2 x 4 feet.
I should have read the comments first about the dimensions! . Thanks for the great idea!
Thanks so much for sharing this great quilt pattern!!!!
I just want to say thanks so much for this tutorial! My brother and his partner are due a baby in a few weeks so I used this tutorial to make a cot sized quilt or playmat. I only used 3 fabrics (admittedly not particularly babyish) and I made it smaller. I found this method of quilting so much easier than what I had been doing for previous quilts. You can view my quilt here:
Raggy : http://i198.photobucket.com/albums/aa296/saffy50/crafty%20bums/5dd515c6.jpg
Non raggy : http://i198.photobucket.com/albums/aa296/saffy50/crafty%20bums/d19a40eb.jpg
It is so cute! Great job!
Wow! Thank you so much for this pattern. I am a beginner (haven’t made a single quilted thing) and this looks like it would be a great project for someone new to quilting. Awaiting the birth of my granddaughter and am now looking forward to this great switch from traditional crocheted baby blanket!
I love this. Do you just have the rag look on the one side or is the back the same way. Very much a beginner..
No, the other side will be non-ragged and look like a quilt, except for the outer perimeter, which will have ragged edges. :)
Thank you, I’m going to try it…:))
I love this rag quilt. I am a beginner and I think this would be a great place to start. Thanks for sharing with everyone. Kay
love, love, love these!!!! I will definitely be making one, and soon!
I made many of these before i finally discovered the ACCUQUILT fabric cutter! They have a 9 inch square that cuts the fringes also. So if you’re doing a simple pattern it is a hand saver!!!!
Finally!! Instructions for making rag quilts that actually MAKE SENSE! I made one for first grandbaby with help from the quilting ladies at the quilt store. By time second grandbaby arrived, I had forgotten how to do it :( and the quilt store has new owners, so no help there, but I muddled through making one with strips of cloth instead of squares. Now grandbaby number three is awaiting his (he’s almost two lol), and I want to use flannel from my dad’s (his great-grandad’s) shirts… and again *sigh* couldn’t find instructions I could understand. THANK YOU!!
Thank you so much for sharing the details on how you do this I have seen so many pictures but no instructions!
New to the sewing and I am going to try this. I know this may sound like a dumb question, but do you buy 8-9 yards of each coordinating fabric (i.e. 6-7 patterns at 8-9 yards)??
Oh no, just 8 to 9 yards TOTAL! :) So you can plan on getting at least 1 yard of each coordinating fabric and you might do a few at 1.5 yards. :)
So, i read through all the comments and through the tutorial again and I cannot wait to make one of these but just so I’m clear with everything: You sew two pieces wrong sides together with batting in the middle. Then you sew the backs (which will end up being right back side with right backside) together with a 1″ seam allowance. then “rag” the seams and that’s the “front” of it.
Thanks so much for sharing your creativity with us.
Sara
Yep, that sounds right…but then again, I’m a visual learner. :)
Thank you so much for this!! I can’t wait to get started. Great tutorial and great info. Thanks for all the extra tips and for responding to everyone questions in the comments. I have always wanted to make one of these but it looked too difficult. But with your great instructions I think I can do it!!
I am so excited to try this! I have been looking for a bedding set for our new little guy but can’t seem to find the colors I want. Now I can make one! For those that have used old jeans do you have to use a different needle on your machine? (Oh, and I posted this fantastic tutorial on Pinterest!)
I Love This Quilt I Am Going To Make This Some Day Thank You For Posting.
I was so tickled to see your pictures on Pinterest! I’ve been making these
quilts for several years now and it’s the only kind of sewing I want to do
anymore. It’s wonderful how “un-careful” you have to be.
I just wanted to suggest a couple of tips that work for me:
I always double stitch all of the seams. I had some trouble with big ole
grandsons tugging on them too hard and pulling the seams loose in places.
When I started sewing the seams twice, that trouble went away.
Also, I take mine to the laundry and have them wash the quilts twice
for me and dry once. I figured this out after stopping my washer up twice!
Love seeing your quilts! Happy sewing!!
Love your quilt. Thanks for taking the time to share. Have you ever used chennile? Have you tried to mix two fabrics?
Thanks,
DA
Yes, I have used chenille and it works great! It does stretch a little bit, so you’ll want to be careful of that. :)
I just finished my version of this quilt. Thank you so much for the pattern. I love it. I feel such pride in the finished product, I made it for my Mon to give as a gift, can’t wait for the little one to be bundled up in it!
Can anyone share what size and how many squares to use for it to fit a twin bed?
The quilt sheet I have says 72″x92″ for a twin quilt. Hope this helps
Hi. Thanks for the great tutorial! I’m just wondering if the small squares are supposed to be 4.5″ not 5.5″ or are the big squares supposed to be 11″? The small squares don’t seem to match up to the 9×9 square. Thanks.
Please disregard my comment, I figured it out. Sorry!
No problem…I’m assuming you figured out there needed to be a 1-inch seam allowance! :)
Thank you, Stefanie! That does help!
Your blankets are so beautiful and I am so excited to try one! Thank you so much for taking the time to share your knowledge.
I recently found out we’re expecting again :) :) so I think I will make one of these for him/her! My son has a different type blanket I made. It would be so fun to make a special blanket for each of my future kiddos. Can hardly wait to get started!
Love these! I first got one as a shower gift for my daughter, 8 years ago. I’ve been making them for every shower I go to ever since! Sometimes I do 4 small squares, instead of the rectangle & squares. But these are ALWAYS a hit with Mom & baby. And when a second baby comes along, Mom always asks for another blankie! :)
I have seen many of these thinking “that’s my kind of quilting!” Thank you so much for the tutorial. It answered all of my questions. However, can you please tell me what the finished size of this baby quilt is? Thanks,
Cheri
Honestly…I have no idea! My best guess would be 42 inches x 49 inches.
SANDY I finished this quilt today using the sizes already mentioned and it measures 52″x45″.
Hi, I am so excited to make this for my first grandchild, due this July. I have a question though. I purchased 100% cotton batting and it says you can pre-wash or not but that there will be 3% shrinkage. I noticed that you said you don’t pre-wash the flannel. What would you recommend? Pre-washing just the batting, neither or both?
Thanks!
Do what you feel comfortable with, but if it were me, I wouldn’t pre-wash it.
Then again, I’m kind of lazy when it comes to sewing…but that’s what I love about the rag quilts is that they don’t have to be perfect. :)
Good answer, I’m kinda lazy about this kind of thing too, lol. Thanks for responding so quickly!
I have seen these a lot on the internet but yours my favorite due to the different size square love it i am now as i am typing tring to figure out one thing win you put the small pieces together with the rectangle you don’t open the seam allowance you just sewing it one way or the other. I have opened the seam and no just figured out that I won’t be able to clip the seams down the middle you know what I mean? Or is there away before I get the old seam ripper out
Hi Jenae,
Thanks for sharing! What are the finished dimensions for this quilt? I want to make one for my Sweet Girl for her someday Big Girl Bed and will need to add to it! Thanks!! :)
Honestly…I don’t know because I don’t have a finished one. The one that was made for my son is slightly different. My best guess would be 42 inches x 49 inches.
I love this pattern! I just started making one to give away as a baby gift. I wanted to pass along a tip for anyone who is as lazy as I am. :) When cutting the fabric, I am just cutting the squares with scissors. After I measured and cut the first one, I used it as a pattern for the rest by laying it on top the fabric and cutting around it. Now, for the really neat trick…cut 42 9X9 inch squares from the fabric. Half of those (21) become the 9X9 inch squares. Take the other 21, fold them in half and cut them. You have 42 of the rectangles. Lay half of the rectangles to the side (21), take the other 21 rectangles, fold them in half and cut them. Then you’ll have your 42 small squares. It would be really time consuming to try to make different size patterns and cut each one individually. As the tutorial says, there is no need for perfection, and my squares all look pretty darn uniform even with these shortcuts.
Ignore my post above….I just realized the smaller squares are 5.5 inches and not 4.5 inches. My bad!! :)
Ok. I feel like an idiot but I accidentally cut tons of squares 5×5. Is there anyway to salvage this fabric? Or should I just start over?
Just make your quilt with that size squares. I’ve done one with 5 x 5s. If it is smaller than you want in the end, then just add more rows! I sure wouldn’t want to re-cut all those squares; that’s a lot of work!
I’ve already purchased cotton fabrics for a baby quilt, having a pattern in mind, but now I see this rag quilt idea and love it!! I would like to use Minky for the backing. Do you think this combination of cottons and Minky will work?
I personally wouldn’t use Minky. That stuff sheds like crazy and doesn’t really “rag”. You need a fabric that will fray well when snipped and Minky/fleece/chenille doesn’t really do the job right.
I’ve made a couple of rag quilts that turned out great but I’ve never figured out how to snip around the outside edge corners. I can’t seem to find it in anyone’s directions. How do you do it?
Thanks,
Diane
Hey there!! I’ve made several rag quilts, always being my go-to gifts for baby showers…..but I wanted to offer a suggestion….instead of using batting, I’ve found it’s easier to use a third piece of flannel. It makes the ragged seams even fluffier, and for me, made construction easier. The first time I made one, I used the batting, but I kept sewing not far enough and the edges of the cotton batting were sticking up thru the ragged edges…I was pulling off cottony globs the first few times I washed my quilt! :(
Thank you for your pattern. I made one yesterday with my bag full of flannel scraps. Thought it would look look to crazy with all my pieced blocks and colors, but it really turned out super cute, if I say so myself. I used poly batting (because that’s what I had). And now I have a totally cute baby shower gift! Woohoooo!
And yes, I will be making another. love it!
I have made 4 of these and I am having a problem with the material getting lent balls all over it after I wash and dry it. I am using flannel and I have tried pre-washing thinking that would help. I also tried washing it in the delicate cycle on low heat but then it didn’t rag. When I wash it in normal cycle high heat it rags perfectly but also gets let balls all over which have to be picked off (they do not come off with a lent brush). Any suggestions? I love these quilts but it puts me over the edge to have to pick lent balls off the entire quilt back and front after I have completed it.
Also thank you for the pattern! I really do love these quilts minus my lent issue which I assume is something I am doing wrong. :-)
I am definitely going to make this for my grandchildren !! Thank you so much for your instructions.It looks awesome, so cozy!!!
just made this quilt, it was so much fun, like a crossword puzzle. Yhanks for sharing it
Where abouts did you get your cute flannel fabric from?
Hi there, I love,love ,love this quilt and am definitely starting one this weekend. One question do you sew your X from corner to corner on each square?
Yes, from one corner to the other. I just eyeball it. :)
Thank you so much for sharing. This quilt is adorable!
Your quilt is sooo pretty, nice and full. I too have made several of these too. A few quick steps to try if you never have made one before is buy your quilt squares and batting (cotton is best) already precut online, Ebay has endless supplies and use scissors that are spring loaded much easier on the hands.
Thank you Jenae I made your pretty baby rag quilt! I accidently cut tiny hole in one of the squares what can I do do to repair it? I’ve made many rag quilts and unfortunely this is the one I snipped. Please help. I’m so worried as it’s for my grandbaby and wanted it to be really nice. Thank you! Christa
Hmmm…maybe hand-stitch the hole? Although I don’t even know how to hand stitch, so I would take it to my mother-in-law and have her fix it. :)
Have just come across your beautiful quilt I definitely have to make one……….or 4 , thank you for your amazing tutorial
I bought everything to do your quilt. This will be my first quilt and at the store for the batting they sold me something made of cotton. The lady told me that this was what quilter use. When I look at the photo it’s not the same thing. Will this work or should I go and buy what you use. I ask the lady should I wash the batting before using it and she said no it will come like a big ball and now I’m afraid that after sewing with only an X in the middle of the square it won’t hold and make bumps of batting after a few wash.
I think the batting you have should be fine. I have even made the quilt without batting before (for summer babies) and it always comes out great. :)
The batting she sold you is probably Warm & Natural. Once it’s in a quilt is doesn’t bunch up at all but it definitely shouldn’t be pre-washed.
I have made three of these for baby shower gifts and the response has been great. Love the pattern thanks for sharing.
Thanks for the instructions, I have just finished making my son one. I only started sewing 3 days ago. Very very simple and very forgiving for a beginner. As mine was for a boy I trimmed the ragged edges to about half so that it didn’t look so ‘frilly’.
Thank you for these great instructions! I’ve never made a quilt because of the perfection required, but this seems totally do-able and forgiving! Thanks so much!
I have been wanting to make one of these since forever ago! Your instructions seem easy to follow! I’m looking forward to trying it! I do have a questions though,When its all done will it be big enough for an adult to use? Or are the measurements specifically for a child’s size? And if it is specifically for a child’s size, then do u have another pattern that could be used for an adult’s size? Or could i just double everything? Please and Thank you!
It’s a child’s size. I don’t have instructions for an adult size, but I think doubling it would probably work fine. :)
I love your tutorial. I’ve tried this before, but always gotten puckers where I’ve sewn the squares together and sewn over the bottom corner where part of the x is. Do you know what I’m doing wrong?
Is it best to wash/iron your fabric before starting?
I never do (because I tend to be kind of lazy), but it would probably be a good idea if you want to! :)
Also, some of the fabric I’m using is minky. Any tips with this? Do I need batting with it?
No, I don’t think you’ll need batting. I’ve used minky before and the other issue I have had with it is stretching and “shedding” during the process of sewing it all together.
Oh wait…I thought this was my tag blanket tutorial, not the rag quilt tutorial! Yes, you’ll want to use batting with it also. :)
I’m brand new to sewing. Just turned on a machine for the first time in my life. I’m sewing the x on the squares, but can’t seem to get the top and bottom to line up perfectly when I’m done. They seem to be off by a 1/4 inch in some places when I’m doing sewing them together. Obviously, I still have lots to learn about sewing. How do you avoid this? How is this going to affect the overall quilt? (Other than the squares may look bunched in some places, puffy, definately imperfect).
I just found this tutorial through Pinterest and am very excited to try one of these! Am expecting a niece at the end of this month and this is perfect for a heartfelt gift.
Hello,
I just received one of these from a dear friend for our little baby girl, just born.
I am overwhelmed, husband deployed and have 3 little babies….How much would you charge or one of the ladies from your church to make me one for older brother and or older sister?
thank you,
Ellen
My first from scratch quilt! Made it twin sized was easy to do, looks awesome with the material I had so didn’t have to buy any!!!! love it
Love the quilt! I bought 7 different fabrics and was trying to decide if I needed to cut (21) 9×9,
(42) 5 1/2×5 1/2, and (21) 9×5 1/2. From each fabric. Or just a total?
No, that is total. But make sure you cut two layers at a time. The number of pieces is for the “sandwiches” (front and back).
For anyone thats making this quilt i followed the dicrections and i ended up with 5 and a half squares across and 7 squares length. it was tricky to figure out but use the pattern of a retangle and two little squares to make one big square this helped a lot.
Thanks for the instructions! Just made this for my sister’s first grand baby – I think it looks great!
Thanks for the great tutorial. I just finished my version of this for my son. It was a great project and made me smile the whole time I was working on. Photos are posted to my Completed Quilts page of the blog.
I don’t even own a sewing machine – but these blankets are so adorable!! I can certainly appreciate the work you put into them. (Saw a photo of your baby blanket on Pinterest) :)
I love your fabric choices! Cute quilts and I want to try your pattern! I have made a few rag quilts in the past (much, much easier than regular pieced quilts) and I have a couple of suggestions.
•There are some scissors on the market, made by Fiskars, that are especially for snipping rag quilts. So, so much easier on the hand fatigue.
•If you’re using a bold color fabric – especially reds – it’s best to prewash the fabric with Retaine so it doesn’t bleed.
•You can use a solid Minky fabric for the back and you don’t need to put the batting in.
•Size guide: Baby-51×51; Child-51×63; Twin-75×87. These are approximate for rag quilts but getting close to these sizes will definitely fit the size of the crib/bed.
I think it’s time for me to dig into the fabric stash because we have some friends that just had twins and you’ve inspired me to get going!
I think this will be the inspiration I needed to start a new project. If it goes well, I just may sell some of these! I LOVE the way they look! I have been a crafter for years, been told I should be a quilter also, but just cannot find the time. This would be entirely possible. Thank You, Thank You!
Sometimes all we need is a smattering of inspiration and you are mine !
Hi, when I made my first rag quilt I chose a coordinating plain flannel to use in between the top and bottom flannel. I think it gives it a nice consistent colour throughout the rags. I didn’t use the top of the line flannel but a cheaper version because most of it is enclosed in the quilt but it means I haven’t used any batting. It does give you three fabrics to snip however and it does hurt the hands. A hint I received from my craft group was to snip as you are sewing and then it isn’t such a chore at the end. I’m doing this now with my second quilt and it does help.
Thank you for the tutorial. My question is the x lines don’t always match up for me. What could I be doing wrong? Also when I cut the strips for the rag will I be cutting the batting as well, won’t that show through as a different color after it is wash? Say I have a red and blue fabric, won’t people see the white batting?
Thanks for the pattern and priceless comments. We have been blessed with 3 new baby girls; twin great grand girls and 1 grand girl. so, I am off and running to make the quilts. Only have 2 weeks, but think it is doable. I have many friends who have made this type of quilt using flannel for top & bottoms and they chose not to use batting or flannel in between the layers. Their thoughts were to heavy. The piece will stay together because of the’ X’ and they were very satisfied results of a warm, cozy quilt. Any thoughts?
My daughter and have made dozens of rag quilts to sell for her adoption fundraiser. We have never used batting with the flannel quilts, it will make it a bit heavy. The only time we use batting is when we sew with 100% cotton. We’ve made rag quilts for babies all the way up to a queen size quilt. Moms seem to love the lighter weight flannel rag quilts and take them everywhere in their diaper bags. Great for snuggling and also as a cover up over baby in air conditioned malls and restaurants.
I was recently given plenty of pre-cut 9 x 9 flannel squares as a donation to our fundraiser and I was not sure what to make with it as our blankets are made with much smaller squares. I can’t wait to put one together with the varied size squares. THANK YOU for this pattern!
I love the look of these, but one thing has always worried me. With all the lint and thread coming loose, do they ever just come apart at the seams? I’d hate to do all that work and it come apart!
I’ve never had one come apart yet! :)
Increíble!… Gracias por tu publicación y por compartir la forma tan sencilla de hacerse, hasta con fotos! Saludos.
I am so making this! I’m thinking about multiplying the squares to make it on different sizes, like for a single or full bed. I love your tutorial. Thanks!
Love this pattern and can’t wait to make it. The back on mine will be a
plain colored flannel. Question for you all:
The X that’s sewn – it’s to hold the batting and squares together? I’m wondering if the squares
could be stippled instead? At least the big squares? It would take longer, but I’m thinking that
since my back is plain, it would give it more definition. Would stippling make the batting too flat
and the quilt not fluffy? Would that affect the raggy ends?
I’m so NOT a visual person and can’t picture how that would look – is stippling do-able and what’s
your opinion on how it would look?
Much appreciated & Thanks for the well explained, easy to follow, laid out tutorial!!
Danielle S. uses cotton flannel instead of batting. Makes me wonder if using flannel the pieces could all be cut the same size and then have 3 layers of fringe instead of 2? Has anyone tried this besides Danielle and had luck with it?
Marie
I just made one out of all flannels, 5.5 X5.5 squares. Didn’t use any batting, only used 1/2 seams and worked great. Took the class at a quilt shop. Think next time I will try all flannels but this pattern, loved the look of different size squares.
Question is do others use regular cotton fabric and not flannel? Would open up another whole world if any cotton fabric works.
I just finished my first rag quilt and used solid flannel instead of batting. I cut the flannel the same size as the other squares so there was 3 layers of fringe. It worked great. I only used 1/2 inch seams.
I really like the look of this quilt with varying shapes to make the squares.
How many yards of each fabric do I need to make this quilt? Earlier you said 1 yard each and possibly 1 1/2 for a couple. Is this quilt that forgiving?
Can I use 1/2 inch seams or does it need to be 1 inch?
Hello!
I made one rag quilt in the past, but I lost the instructions! The one that I made was rectangles that were stitched together to make the square, and the directions the patches were laying alternated horizontal and vertical. Do you happen to have dimensions for that pattern? will the amount of fabric change?
I’ve never made any other patterns of rag quilt. So sorry!
If a baby quilt uses 8-9 yards of fabric, does that actually mean about 40 yards for a twin? That seems like an awful lot.
No, I don’t think you would need that much. 8-9 yards is a liberal suggestion…I would think 20 yards should be more than enough for a twin quilt. Then again, I haven’t ever made a twin size. If you do it, let us know how much fabric it took for you. Thanks!
Is there anyone that can help with my question?
I am making one of these blankets for my youngest neice for xmas. I wanted to make it so the “rags” were on both sides. How would I go about doing this? Thank you for your help
I don’t actually know that this is possible. I would have no idea how to do this, anyway.
Do you think if I took the front side and the betting sewed them together like the instructions. Then just sew the back together like the front without the batting. Then sew around the edge of both pieces because you have to do that anyways and to keep them both together sew different shapes in the middle of each square securing all the layers together. Do you think that could work?
You could also just sew the squares together wrong sides together, once for the top and once for the bottom. Then lay it out with batting between and sew the x’s across each square. Pinning would help keep the edges together better. If you use flannel, especially, you wouldn’t even need batting.
My daughter has made a couple of twin size ones and if I remember right we used about 12 yards maybe a little less. I just made a baby with about 4 yards not exactly the same pattern as this one our squares were all the same size we did 6 inch squares turned out cute. We also don’t use batting in between the layers we just add another square of flannel between the two layers and stitched the middle. Hope that helps.
I also only do 1/2 inch seams
Hello and thanks for these instructions! Two questions: First – do I need to change my sewing machine foot when I start sewing the squares/rectangles together? Second – when I start sewing each small piece together, how does it work so that the “fringe material” doesn’t lay down when I sew on the rectangles to the 2 squares that are together? Does that make sense? Thank you!
I do not change my foot. We just plow through all the layers. :)
I’m having a hard time understanding your second question. You’ll basically sew one side of the pieces and then unfold it and the fringe side will stick up.
I always make my rag quilts with Flannel especially for the babies :) Rag quilts are really cool made from old jeans. I made a king size one with all my husband and kids old Wrangler jeans and pockets. I love making these quilts
I just want to say thank you for showing me how to make this quilt. I just finished my first rag quilt. Im not very good at sewing anything but with you help I made a quilt for my daughter and I have 4 more to make for my friends that are having babies this year.
Awesome! So glad you found it to be helpful! :)
I don’t understand how you need 8 yards of fabric.
You won’t use all of the fabric. But because there are lots of different sizes of squares/rectangles to cut, I found that I needed about this much.
I am using 4×4 small squares so my large squares would be 6×6 and my rectangles would be 4×6 right with my batting sizes being 4×4, 2×2 and 2×3 right?
Can you use fleece? Or does it have to be flannel?
And I love your quilt , it is so pretty.
I would use flannel or any other type of cotton fabric. I haven’t used fleece before, but I don’t think it will rag when you wash it.
Ok. Thank you for your reply. Lovely blanket!
Thank you so much for sharing. I have been trying to get back in to sewing, and this has inspired me. Have a beautiful day, and lots of fun. God keep you.
This is a great tutorial on a rag quilt. I have never quilted before but have wanted to for awhile. Just got a new (slightly used) sewing machine and I can’t wait to use it.
My son is 14m now and I have all of his felt swaddling blankets from when he was little. They are still in great shape and wanted to do something with them to keep as a memory. I will be making this for sure.
I love seeing all the pictures they are so helpful! Not many people put them up like you do. I am a visual learner so I am grateful!
Great tutorial! Just wondering about how long it took you to make? I bought 7 1/2 yards of flannel for mine yesterday, so excited to start it. :)
It’s been a while since I made one, but probably about 8-9 hours total (including cutting the fabric and snipping the edges after it is finished). Good luck!
How much batting did you use / buy? It doesn’t tell how much and also how wide of batting and what kind works best.
I use the low-loft batting that you can buy in the bags. :)
This is so nice, it looks really comfortable. I think you could use an old blanket for the batting, and I am not a patch worker but I think I could do this one, thank you for this tute…
Quick question. When I sew together the two small squares and then sew them to the rectangle, do I leave all seams open, or fold to one side? Then when sewing to the next row, are seams open or folded to one side. Thank you so much for your instructions.
hi, wanted to let you know your blanets are beautiful. I have made many of these blankets in many sizes. I have found that using the june taylor cutting ruler is so much faster. It is a large square plastic rulur with slits in it ever inch and your rotery cuter fits in the slit . so you can make many cuts without moving the ruler. and note to followers. if the blanket isn’t big enough. you just add more rows. have fun sewing
Thank you so much, Renea! I am going to have to look for that cutting ruler…cutting the fabric is the part I hate. :)
Thank you so much for this pattern, very much a novice but found it really easy to follow. Probably not the best time to find fleecy material in summer in Australia but nevertheless I think it turned out great!
Hi I am trying to make this well I did few mistakes here and there and I missed out the part about the fabric. I have cotton fabric would it be alright to use that? Is the effect still the same? or should be flannel? thank you heaps.
You can still use cotton. It might not be quite as snuggly, but it will still work well! :)
thank u I just made it like a normal quilt and I have a flannel bedsheet so I’ll just make another using that :) thanks again
I have made some quilts in my life, want to try this beautiful rag quilt. they seem so like from the past. will let you know when I finish one.
I think your quilt is so beautiful that I had to try and make one. I have all my squares cut out and am laying them out on the floor to connect them. But it looks awkward, like the 2 smaller squares look bunched up in their spot. I am just wondering does it come together ok? I noticed even in you photo it looks like they are sort of squeezed in there. I will start sewing this week and see how it comes together.
Thank you for posting it!
Yes, it will look weird until you actually sew it together because the seam allowance makes a big difference on the squares with the large rectangle and two smaller squares. I think you will be pleasantly surprised when you get it sewn together. :)
Yay! Yes, it is coming together great! I am enjoying the process so much, I may have one going all the time. I will send you a pic when I finish.
Linda
Please, PLEASE don’t plan to make these rag quilts to give to a newborn! They’re meant to produce a nice soft, snuggly finished product, and all the lint that comes from the cut-up edges can easily get into a baby’s nose and mouth. Little tiny people can’t pull things away from their faces and you’re just asking for a smothered infant. After 8 or 9 months, the story changes and quilts like this will undoubtedly be well loved and well used.
Please do your part and spread the word of this danger to infants. I teach Beginning Quilting and am amazed at the number of new quilters who don’t know about this.
About what are thefinished dimensions of this quilt?
what is size and how much bating is needed please
This is simply delightful!
Thank-you for sharing the tutorial and pictures!
can you give me the finished measurements please
Thank you sandra
What are the finished dimensions ?
What is the finished size?
Best instructions ever!!! Very easy to follow and great pictures!
Thank you!
Just found your baby quilt and want to try it as soon as I get everything I need together thank you so much will write back when ever I finish it.
Thank you
Darla
Love the quilts..and love the easy to follow instruction!, thank you! I do have one question though, what would you do to make this an adult size quilt? Would you double the number of squares you need?
Just double or alter the block count to make whatever size you want. No right or wrong when making a rag quilt.
I understand there is 1″ seam allowances all around. The batting sizes 7×7 match the larger fabric squares 9×9. But then you have 5.5×5.5 fabric with batting only 3×3…shouldn’t the batting be 3.5×3.5? Same with 9×5.5 fabric….You have batting as 7×3…shouldn’t that be 7×3.5? Is there a reason the batting on these squares is more than 2″ less? Thanks!
Yes – Once you begin ragging, you do not want the batting to show. It will be contained in the block. You will be using 1″ seam allowances. That’s where the 2 inches comes from. Hope this helps.
what is the finished size of your baby rag quilt ?
Thanks,
A.
What is the finished size of this quilt?
Just wondering if you pre-war the fabric? I have seen some where they do and some don’t.
After spending hours on a rag quilt for my grandson, I’m disappointed to realize that I made an error throughout the project that can’t be corrected. I sewed all the seams open. Now each square has an excess piece of fabric after “ragging” the edges. Should I have sewn the seams to one side? Other than that, I appreciate the detailed tutorial..
Joanne – Please explain a bit more by what you mean by an excess piece of fabric. You should have your seams exposed. I may able to help you. Usually nothing isn’t fixable.
Thank you for an inspiring quilting idea. Thank you to Darlene (March 4, 2015)
also for that thoughtful warning about waiting to use the quilt untill the baby is 18 months old. I agree with you 100%!!!
Hi! I love this and I’m going to make it for a baby gift. I’m on a fixed budget so I just wanted to double check the amount of fabric because I’m on a fixed income……9 yards for a baby quilt seemed like a lot. Is that what I truly need? Ty!
Hi Jenae,
I loved this post, I made it with flannelette, I brought 6 different x 1/2 meter of fabric and my squares are 16 centimeters. I also have plenty of material left for other projects or even a dolls pram blanket….mmm good idea…for the backing I alternated the pattern that’s on the front.
Your tutorial is perfect. The hardest part is the snipping all the way round, doing it in stages worked well.
Thank you for creating and posting.
How do I post a picture of my blanket?
So glad it turned out! You can email me your photo to [email protected]. Thanks!
this is a nice blog post! it is very helpful if you are thinking to give your baby a great quilt. thank you, Jenae for this amazing blog
I’m struggling to understand how you piece the two smaller squares on to the rectangle. What is the seam supposed to look like? Do I fold the seam of the squares down so like fabric is touching like fabric and the seam is “open” or do I “close” the seam and fold over onto one fabric square? Do you happen to have a picture of the correct way to see it?