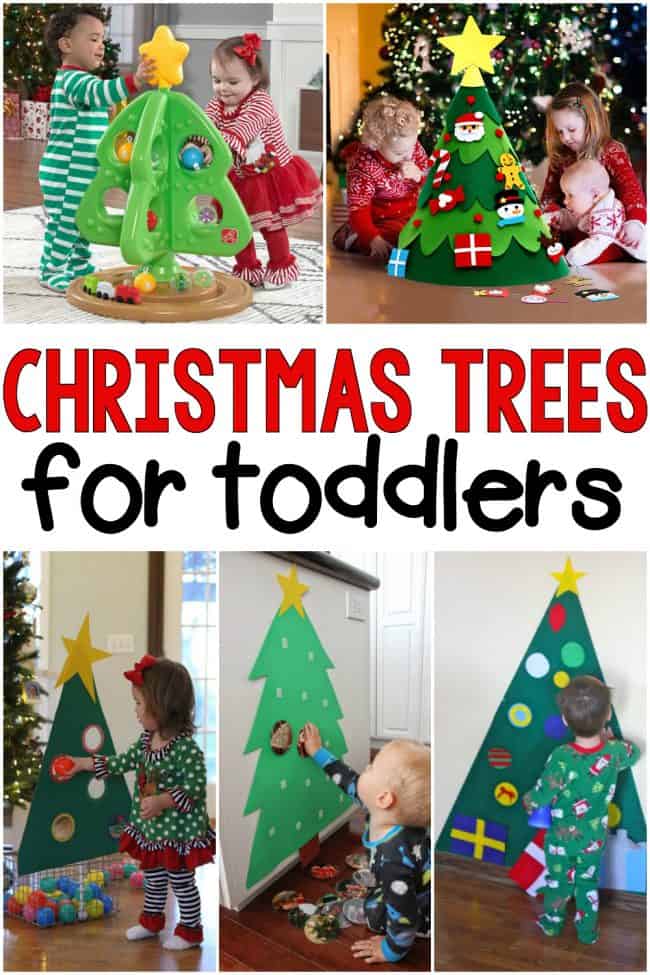
3 of the Best Language Games for Little Kids

3 of the Best Language Games for Little Kids


Guest Post by Kathryn of Kids Games for Speech Therapy


As parents, we know strong communication skills are one of the most important foundation skills that we give our kids. So much is riding on language in later years.


Laugh


As a Speech-Language Pathologist, my job is to help when kids need an extra boost. Families often ask me to recommend toys and games . Gadgets and expensive toys have their place but for the most part, you need fun time to interact with your kids and a few basic props to make it great!

Here are my top 3 ideas (and I bet you have them at home already!)

1. Nursery Rhymes

These are not technically a game but they have to be my number one activity. They develop so many important areas of pre-language skills.

Teaching your child traditional songs and rhymes such as the Mother Goose Rhymes expands their vocabulary, develops attention and listening skills and gives them an early awareness of the rhythms, rhymes and cadence in speech.

Tip: Mix it up to get benefits for both of you. Put the CD of rhymes on in the car when you need peace and quiet then later, spend time together singing rhymes and joining in action songs.

2. Shape Sorter

OLYMPUS DIGITAL CAMERA

Traditionally this toy teaches shapes and colors but in the early years I use it for something more.  Turntaking is an important communication skill, (so we don’t all talk over each other!) We teach it first though play.

Place the sorter between you on the floor. Post in a shape saying “Mommy’s turn” then help your child to post in a shape saying “Your turn”. Keep going like this until they understand that you are posting in turns.

Tip: This also works great with building block towers or even cleaning up toys into the toybox!

3. Blowing Bubbles

toddler-learning-activities

No Speechie could survive without bubbles! They are fun, kids love to join in and we use them all the time.

If your child is at the first words stage – these are for you. Take the bubbles out and have fun. Make it exciting as you watch them float away together and ham it up as you chase and “pop” them.

Next time you play, pause as you draw the wand. Look at your child right before you blow, using this moment of anticipation to say “bubbles?” or “more?” Then go right ahead, blow the bubbles and have fun. Each time, make the pause longer, looking at your child with excited eyes, paused to blow before saying “more?”.

I have heard plenty of first words when a child can’t wait any longer and tells Mommy “more” or “pop”!

Tip: If your child is not ready for words yet. The excitement and together time you get with this activity strengthens the playful bond that will help you when your child is ready to talk.


Kathryn of Kids Games for Speech Therapy is a Speech and Language Therapist and Mama to a busy bundle of toddler fun!

She enjoys crafting and creating printables for Speech Therapy and you can typically find her sitting at the laptop late into the night, trying to put the finishing touches to the latest download to make it “more than perfect”.

Originally from the UK she now lives in Ireland, sometimes dreaming of sunnier days but mostly enjoying the green fields and country way of life.

  • Share This Post:
  • Share This Post on Facebook
  • Share this Post on Twitter
  • Email this Post

New Year Glitter Playdough

Ring in the New Year with Glitter Playdough!

Our Christmas festivities were wonderful, but now that they are over we get to look forward to a time of new beginnings, de-cluttering, and starting fresh!  I am already convinced that 2013 is going to be great!  Two awesome things we have to look forward to is my big brother getting married in July and the birth of a new niece or nephew on my husband’s side of the family!  I’m sure there will be other unexpected surprises as well!

What a great time to celebrate with some New Year Glitter Playdough!  Unfortunately, I wanted to use ALL the colors of glitter (which was very fine), which made it end up looking a little gray in the end.  Oh well!  We still had fun with it!

Here’s the recipe for playdough:

1 3/4 cups flour
1 cup salt
2 teaspoons cream of tartar
1 1/4 cups water
2 1/2 tablespoons oil
Glitter
Essential oil for scent (optional)


IMG_7378

 1.  Mix all the dry ingredients first, then add the water and oil over medium heat.  If you choose to add a scent, add your essential oil now as well.


IMG_7380

Grab your glitter (we received ours compliments of CraftProjectIdeas.com).


IMG_7381

 2.  Stir the glitter in before the mixture gets too firm.  Once it thickens and congregates in the middle of the pan, stir just a tiny bit longer.


IMG_7384

 3.  Dump the playdough onto your countertop and cover with a dish towel until it is cool enough to knead.


IMG_7386

 4.  Knead until smooth.


IMG_7406


IMG_7390

 5.  Make the numbers 2-0-1-3…


IMG_7392

 …and add some pom-poms for fun!


IMG_7395


What’s your favorite way to ring in the New Year with your children???

  • Share This Post:
  • Share This Post on Facebook
  • Share this Post on Twitter
  • Email this Post

Learning about Spatial Awareness with Boxes

Spatial Awareness with Boxes

Post by Contributing Writer Jennie

I don’t know about you, but I LOVE doing my Christmas shopping online!  When the packages arrive on my front porch I am not only excited for the contents inside, but I am just as excited for the boxes they came in!  Around our house, boxes equal hours of play time fun for all three kiddos!  They also provide an excellent activity to teach spatial awareness.

Here is what you’ll need: boxes of various sizes and a few toys

To get started, set the box on the floor with a few toys inside of it and invite your little one(s) to come and explore.


Gently set your baby inside of the box or let your bigger kids climb inside.


I started with a smaller box that Twin Girl and Twin Boy could see out of, and then I moved them to a bigger box that had taller “walls.”  This was a fun place for them to “hide” and play peek-a-boo.


I took this box and opened up both ends to make a tunnel that they could crawl through.


We also have a really big box that they could all walk or crawl inside of.


Our all time favorite box is one that their Daddy made into a “fort!”  He cut a little door out of it and some windows too.  They absolutely LOVE crawling in and out!


I laugh to myself when I see my kids try to squeeze through a tiny gap between our furniture and the wall because I know that there is no way they can do it; however, they do not know this yet.  They need those opportunities to understand how their body size and shape fits in a given area.  Using boxes to teach spatial awareness to young children allows them this key opportunity.


Jennie is a stay-at-home mom to a 3 year old boy and 1 year old boy/girl twins.  She received a degree in early childhood education and has several years of experience teaching both Pre-Kindergarten and Kindergarten prior to having children.  She realizes that as busy moms we need simple ideas that will make a BIG difference to our young children!

  • Share This Post:
  • Share This Post on Facebook
  • Share this Post on Twitter
  • Email this Post

Petite Picasso


Post by Contributing Writer Jennie

“Every child is an artist.  The problem is how to remain an artist once we grow up.”

-       Pablo Picasso

This quote from the famous artist is so true!  I remember as a young girl loving to draw.  I kept sketch books for several years; however as I reached my adolescence I slowly stopped.  Art class was not mandatory at school anymore and I didn’t have as much free time either.  The leisurely pace of childhood had passed.  I think the importance of this post is two-fold: to first, work on your little one’s fine motor skills by teaching them to scribble, and secondly, to instill a love for “art” at a young age!  Some children will be naturally drawn to art more than others and that’s okay.  Every child has different interests and abilities.  However, we as parents (and our children’s’ first teachers) can allow them essential time to slow down life and be creative!  Take a few minutes every day to scribble, paint, mold with dough, or any other activity that speaks to your child’s inner artist!

For this particular activity, here is what you’ll need: crayons and markers, a large piece of paper or a brown paper shopping bag, and an adult’s lap to sit on.

Begin by showing your baby the crayons and paper, and then demonstrate how to scribble on the paper.


I chose to use the side of a brown paper shopping bag because it is larger than a regular piece of copy paper.  Our large muscle groups (gross motor) develop before our small muscle groups (fine motor), so it is difficult for a baby to scribble on a small piece of paper.  I also chose to use crayons because the wax on the paper provides friction, which is stimulating to the nerves on the fingertips.  This tactile exercise sends a stronger message to the brain versus a writing utensil that doesn’t provide much friction, like a marker.

Now, let your little one have a turn.  He or she will likely draw in a circular motion as this is the easiest motion for a baby and even a young child to do.


I repeatedly had to remind Twin Girl that “We don’t eat crayons.”  (This is why I said you need an adult’s lap to sit on! J)

As your little one scribbles, talk to him or her about the picture: “What color did you use?  What shapes do you see?”

Now help him or her press down firmly and then press down gently.  Use those words to describe the different pressures.


Next, I offered Twin Girl a marker.  I chose to use a marker this time so she could see the fruits of her labor easier!  Like I wrote earlier, a baby’s fine motor skills develop slowly, so she does not have the strength she needs quite yet to “color up a storm”!  She can color with the marker much more effortlessly.


This first piece of art work may not be “fridge-worthy”, but you did provide a vital learning opportunity!


Jennie is a stay-at-home mom to an almost-3 year old boy and 9 month old boy/girl twins.  She received a degree in early childhood education and has several years of experience teaching both Pre-Kindergarten and Kindergarten prior to having children.  While she jokes that she’s had a successful day if “no one goes hungry or gets hurt”, she realizes that it’s the little things we do that we might not even know we’re doing that make a BIG difference to our children!

  • Share This Post:
  • Share This Post on Facebook
  • Share this Post on Twitter
  • Email this Post

Learning Walk

*This was originally posted 2 years ago, when Big Brother was the same age as Little Brother is now!  Little Brother and I have been enjoying our “learning walks” whenever Big Brother is at preschool.  I’ve peppered in a few new photos as well!*

Sometimes the simplest things can be the most meaningful…

The weather has been much nicer lately, which means it is cool enough in the mornings to actually go for walks!  I just started pointing out numbers and shapes on our walks and Big Brother, and now Little Brother, are hooked!

Making knowledge meaningful in real-life situations is really one of our biggest goals as parents.  What better way to do this than while getting a little exercise for ourselves?!?  I know I certainly need it!  :)

Mailboxes make great practice for number recognition…

 Many shapes can be found by just looking around…
 
Circle:


My two little loves…bed head and all!


And, of course, we had to stop by the park for a little gross motor fun:

(He is sooo little!)


The possibilities are endless with a little fresh air and sunshine!

What simple and meaningful ways do you encourage letter, shape, and number recognition?

  • Share This Post:
  • Share This Post on Facebook
  • Share this Post on Twitter
  • Email this Post