Handmade baby gifts are the sweetest! This beginner-friendly tutorial will teach you how to make a DIY Taggie Blanket for a special baby in your life!
I first learned how to make one of these mini DIY Taggie blankets when a student’s mother quickly gave me a 2-minute verbal tutorial while picking her daughter up from school! I made Big Brother one before he was born and he loved it, especially around 3 months when he could put the little ribbon tags in his mouth. It was then passed down to Little Brother, who still sleeps with his every night. I’ve made several for baby shower gifts as well. These ribbon blankets are intended to be cuddled and chewed on!
This is SO EASY to make, you could make it even if you’ve never sewn. And it will take you less than an hour. Just borrow a sewing machine or head over to a friend’s house if you don’t have one. I promise you this…the hardest part of the whole thing will be figuring out how to thread the machine!
Initially, you might have to fork over around $10 for fabric and ribbon, but it should make at least 3-4 ribbon blankets! Plus, everybody loves a homemade gift for baby…it just makes gift-giving much more personal.
Here’s what you’ll need: 2 pieces of fabric cut to 12″x12″; several different colors, textures, and widths of ribbon; a sewing machine; pins and thread.
How to Make a DIY Taggie Blanket for Baby
 |
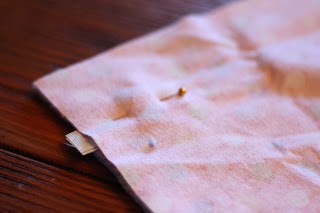
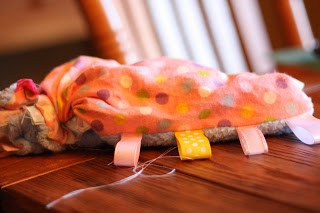
| 1. If you didn’t already, cut your fabric to a 12-inch by 12-inch square. I like having two textures–the blue fabric is soft and fuzzy and the pink polka-dots is flannel. |
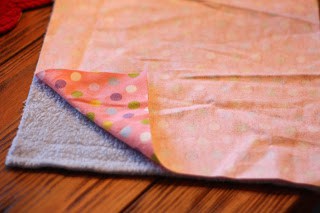 |
| 2. Lay your fabric on top of eachother, right sides together. |
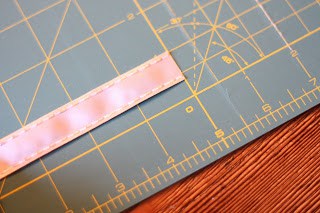 |
| 3. Cut your ribbon into 5-inch strips. You’ll need about 16-18 strips. |
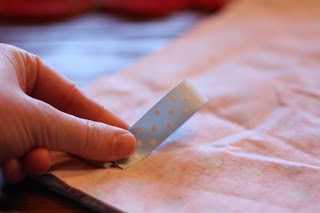 |
| 4. Fold your ribbon in half and crease it as best you can. |
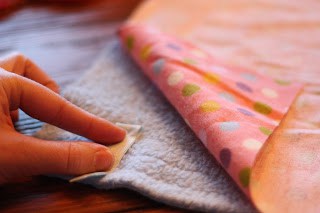 |
| 5. Place the ribbon in between the two layers of fabric, with the ENDS of the ribbon sticking out (meaning the CREASE will be inside the two pieces of fabric). |
 |
| 6. Pin it in place. |
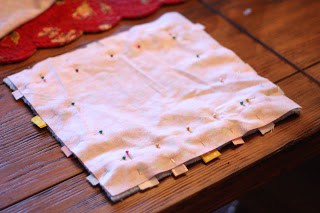 |
| 7. Continue with the remaining ribbon. Then start sewing. |
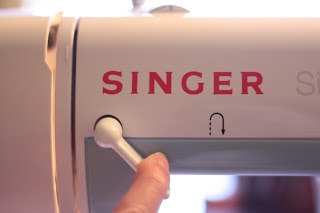 |
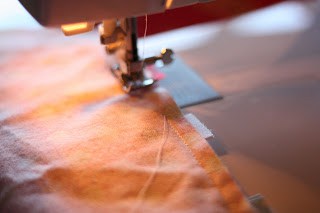
| 8. Once you get to a ribbon while you’re sewing, back stitch at least 3 times over THE ENTIRE LENGTH of the ribbon. This will ensure that the ribbons will not come loose, even when tugged and gnawed on. Make sure you do this with every ribbon you sew over. |
 |
| 9. Once you’ve sewn the entire perimeter, leave the space between two ribbons un-sewn (just back stitch the ends so it doesn’t come apart). |
 |
| 10. Turn inside out. |
 |
| 11. Stitch the remaining section that was never sewn together. I just use my machine. You COULD hand-stitch it and it would probably look nicer, but I honestly don’t know how to hand-sew…so I’m of no help. |
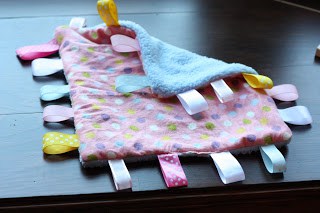 |
| All done! |
What homemade gifts for babies do you like to make?
First published on November 8, 2010
Related Posts
-
-
-
Baby BouncePost by Contributing Writer Jennie Everyone loves a happy, bouncy baby, right?! If I could…
-
-
-


This is great! My son (22 months old) loves cuddly things, and I'd be so happy if he used this as his lovey since it is so easy to carry around! Big stuffed dogs are a handful :-) Thanks for the post!
Great tutorial! I've always thought of making one of these. Thanks.
Calla loves taggie blankets. Thanks for the great tutorial. :)
This is great for baby showers. I think my 23 month old would love it too :) Thanks for the tutorial
These are so easy! My little 6 year old made one awile back. Your tutorial makes me want to have her do a few more. Great pis.
Very cute! I am making a ball taggie for my little niece for Christmas this year!
What is a ball taggie, and how can I find out how to make one?
I love your blog! Found this post through Money Saving Mom.
I love all things early education, but add crafty to it and I am doubly hooked.
Thanks for all the great activities!
Made one tonight, super easy, turned out great. Thx so much for the great idea!
Why buy a taggie when you can make one and have it become a keepsake! What a great tutorial!
I am going to make one for my pug. He loves to chew the tags on all of his toys. Thank you!
I made homemade blocks for my grandson. Used material with animal faces for one set and mixed red flannel and puppies for the other.
I made this today for a baby shower I have tomorrow. Check out my post on it here- http://oneagleswings-tabitha.blogspot.com/2010/12/tag-blankie-for-baby-shower.html
I refered back to you. Thanks for a great project.
I just finished mine up! Here's the finished product and a referral back here. Thanks for the fantastic blog – keep it up and I hope you all start feeling better.
http://serendipitouslycreate.blogspot.com/2010/12/havent-had-time.html
Too funny, I make mine the exact same dimensions, it is a fun and easy way to personalize a baby gift
Awesome Tutorial….can’t wait to try it. Someone made one for my little girl and i have looked at it and racked my brain with how to make one….your pics and directions makes perfect sense!
Oh..I like to embelish cloth diapers as baby shower gifts. They make great burp clothes, changing pads, or diapers!
Made two of these today for my friends that are having babies soon. I made mine a little smaller – – 9×9 squares and 9-12 ribbons. Also, I finished mine off a little differently, so I thought I’d share in case anyone else liked the idea. I I thought it was an easier and less noticeable way to close the hole that is left for flipping it right-side-out. Anyway, after flipping it I just did a straight stitch all the way around the blanket, about 1/4 in from the edge. It’s a little more sewing, but I really like how they turned out!
I have done mine the same way in the past too Sonya. I think it gives a neater finish.
Thanks for the tutorial. The pictures were great! I can hardly wait to get started!
Thanks for the idea and all the great pictures. I made one tonight for my 5 month old and it turned out SO cute!
Great tutorial, have pinned it and shared on FB!
Thanks for the Tute; made my DD a taggie last night & found your blog & checked to make sure I was doing all okay. It turned out real cute even though, for some unknown reason, I cut my ribbons to 3″ instead of 5″. O well, DD seems to really like it! Thanks, again!
I am making these for all my pregnant friends :) I hit Hobby Lobby at the right time and got chenille fabric and the ribbon for 50% off! Can’t wait to see how it turns out!
Love this! Made a smaller one for my niece who just started teething, and she loves it. I also made a slight addition to it and put some foil tissue paper(piece of an empty baby wipe package works great too!) Inside before I sewed it shut, now its her favorite toy, she can chew on it and it makes noise.
Thanks so much!! I cant wqit to get started!! do you have any other projects? EASY ONES please!!
this is a great! I am going to try and make one. One question: What kind of ribbon do you use? I just wondering after the little ones are chewing them, would they frey?
thanks
Debra
I just use the cloth ribbon you can buy at any craft supply store. My son has had his for over 3 years (and still sleeps with it every night–washed once a week) and we haven’t had any fraying.
My daughter loved her blankie like this when she was little. But a word of warning…just be careful you are only making these for personal use and not for resale – Apparently the Taggie company has a patent on these and their legal department comes down hard on anyone trying to sell them. (Ridiculous, I know.) :-(
thank you so much, I will be a first time grandma in the fall. My baby item radar is on high alert, I saw one of these tagged lovey’s at a craft fair and knew there would be great DIY info somewhere. I am so glad to have found yours. thank you again. very well written.
Love the tutorial. My kids love taggie blankets but they are expensive. Looking forward to making my own. Love your name BTW :)
I just finished sewing the ribbon blanket using a Dr. Seuss pattern and coordinated with some colorful ribbon. It came out so cute and I can’t wait for my granddaughter to give it to her not born son yet. I’m also making a blanket to coordinate. Had thought about a pillow but liked this craft much better. Thank you for making it such a fun craft.
I just got a ribbon blanket for my new grandbaby and I thought that things were to be attached somehow to the ribbons for playthings. so we googled your site and discovered that babies are to suck on the ribbons. My daughter was horrified as ribbons are made from some sort of synthetic materials which are not natural and who knows what poisons are in them. i’m trying to figure this out. Also, wouldn.t there be dyes in the ribbons? Please help me to understand why ribbon blankets would be safe for babies
I would love to link this to my blog with a re-creation that I am planning on doing… If that would be ok with you :) I love this tutorial and it looks SUPER EASY!!
These are great gifts and my baby loves all of hers. Great tutorial! You could top stitch around the square once you have it all together for added strength. Also, I like to make sure not to use ribbons with painted on patterns. I’m very weary of that since my daughter always chews on the ribbons. Very nice project!
Sailing Rules and Instructions The basic rules to be followed while
sailing or racing on seas are those set by International Regulations for Avoiding Collisions
at Sea. There is an opportunity to take six ASA courses to become certified at
sailing. It is wise to plan your first trip with a good yacht charter company who are well organized and experienced in Caribbean Sailing.
The picture shows loops on the outside, The instructions say pt the crease (fold) on the inside. I just thought you should change the photo since little fingers can get caught in the loops and if the loop twists it can cut off circulation. I’m going to make one of these for a quick baby shower gift, do a big quilt for Christmas baby.
This is lovely and intend to make one for my Niece with labels from clothes as she loves these……I was wondering Jenae if i could make some to sell and a craft show?
Regards Jennie
There is certainly a lot to know about this topic.
I like all of the points you’ve made.
Those are great, and fun to make. Does anyone know how to make the frog 12 x 12 lovie blanket? Where can you find the frog to sew onto the soft material?
what ribbon is safe? since the grandson will be putting it in his mouth. im sure not all the ribbons are safe, such as dyes and such. thank you for your time.
I would really like to hyperlink this to my weblog with a re-introduction that I am making plans on doing… If that might be adequate with you :) I love this academic and it seems SUPER EASY!!